Showing posts with label Pavillion. Show all posts

Saturday, March 19, 2011

Another site for extant tents

My mother has a bit of an adventurous streak in her, and in the late 80's she moved off to live in Turkey for about 10 years. Thus, when I told her about my interest in period pavillions she casually informed me that there is a collection of ancient tents and liners in the Turkish Millitary Museum in Istanbul, and then she gave me books!

(I can only find one of the books at the moment: Osmanli Cadir Sanati (XVII - XIX. yuzyli), Taciser Onuk, T.C. Kultur Bakanligi, 1998. In English: Ottoman Tent Art (XVII - XIX. centuries))

I, of course, devoured the books a gulp and rushed off to look up the Museum site, which I present to you here

Askeri Muse ve Kultur

Note: click on "Albumler" and then "Cadirlar" or, if you can find it, "Askerî Kıyafetler Salonu,' or "Üst Kat Salonlar" and then "Çadırlar Galerisi." I warn you, the links shown in the menu on the left of the page seem to change nearly every time I go to it. but keep trying. sometimes clicking on white space will make a whole new list of choices appear. (This works for me when the cursor, not the arrow is showing as the pointer.)

I managed to wend my way quite deeply into their photo galleries a few years ago, but then my computer crashed and I lost all the links so I am simply posting what I've got, for now.

I hope to get back to this on-line research project at some point, but for now I am making a pavillion! (Busy, busy.... :)

Note: see comments below for a bit more explanation of how I've found the pictures when the links aren't showing...

Friday, March 18, 2011

Pavillion Progress Update-1

In case you were wondering...

Yes, I'm still working on the pavilion.

I've finished the black couching on the second mottoe panel, and am currently working on the same outlining on the WATER panel for the back doorway. My hope is to get both back doorway panels done, and the two doorway/awning sections assembled this weekend. Look for pictures by Monday!

On other fronts, I am considering what to use to make the soft furnishings for the outside of the tent. I know I'll be making cushions for our chairs, and probably a mosquito netting screen house which I can attach under the awning flaps. (Mosquitoes really love me, but the feeling isn't mutual!) And I agree that we need standards...

Oh yes, and poles of course!

But all of that is for another day, right now it is all about the couching.

Monday, March 14, 2011

Update on the Mottoe

The second section of goldwork is finished! Amazing. I thought it would never be done and then--poof--FINISHED! OK, OK, I still have to do the black outlining on that section, and two of the doorway panels, but still, FINISHED!

I might--just possibly--actually finish this pavillion in time for Pennsic. (I sure hope so, or we'll be sleeping in a day shade!)

More about Sketch-up

I just discovered that if you go to look at my designs on the sketch-up page you don't *have* to download an object to be able to see the entire circumference.

If you look in the upper right-hand corner of the picture frame there are two buttons "Image" and "3-D View". Clicking the 3-D View button just let me pivot the trailer so I could see all the sides.

Cool.

Downloading the trailer will let you actually go *inside* to take a look around there too.

(BTW, Sketch up items are shared by their creators to be *used.* Which means that you can tinker with things and make your own creation. I started my Tudor trailer plan by finding someone else's 7'X14' trailer to base my work on. Just like I would if I built it for real.)

But I'll get off my little "sketch-up is so cool!" soapbox for now.

Saturday, March 12, 2011

The Funny Thing About Giving Yourself Permission...

NOT to do something, is that it sometimes has the opposite result!

After spending last night working on the design for the back roof of my pavilion, I got up this morning and promptly started to work on the second section of the motto. Go figure.

Giving myself leave to do something else seems to have put it back on the 'fun' side of the scale and I am already halfway finished with the ribbon-work part of the task. I'm not promising this rate will continue but to go from 2 1/2 letters finished to 15 finished and several others started feels great!

Maybe there will even have to be pictures soon...

Friday, March 11, 2011

The Roof at Last!

As I predicted, the--apparently endless--stitching on the mottoe has gotten be be a bit more like drudgery than I can handle, so I am commencing work on the dragon applique for the roof sections of the pavillion. (And can I just say, WooHoo!)

I'm hoping the first panel will be comparitively simple--since there is not much more actual applique than there was on one of the door panels--but you know how I am...

Anyway, here is

A close up of the pattern for the front roof


I'm thinking I will adapt it to make the back roof. Maybe something like this:

Proposed back roof panel


I think it's not quie busy enough--maybe she should be holding foliage to feed the dragons? (OK apparently they are wyverns, but close enough for me!) Still a work in progress, obviously.

Wish me luck!

Friday, March 4, 2011

Hmmm.....

The Plan


So I'd been thinking it would be nice to upload my sketchup version of the Pavilion so that people can see where I am going...of course it was at home and I was at work but I uploaded a draft version (too tall, not wide enough, etc) so that I could see if I can get it to work...

and...

Ooo! Success!

Then I went home and figured out how to capture an image of the project, as well as uploading the real deal into Google sketchup 3d. if you follow the link by clicking on the picture you can download my plan and tinker with it to your hearts content--though I warn you that I am still learing how to use sketchup and I tend to just keep adding planes until the thing looks right when I've gotten things a bit...off.

Thursday, March 3, 2011

Better...Stronger...FASTER

It seems I wildly overestimated the time it would take to complete step two. (Especially if I ended up stuck at home with the stomach flu!)

The first 9' section of mottoe applique is finished. That piece is the section which will go over the front doorway just above the AIR and FIRE panels. After some elaborate calculations I have figured out where the text will fall on the 9' section over the back door, marked out the text, and started the applique work there too.

I hope to have both doorways finished by the end of this weekend, if all goes well.

The finished section of Mottoe


The second section


To give a better idea of the scale/construction of the Pavilion here is a photo of: the roof, mottoe and doorway panels laid out as they will be assembled


and finally, a picture of the source design for the dragon on the front roof of the pavilion

Tuesday, March 1, 2011

Here be Dragons!...

OK, now couching down the black cord on the door panels goes really fast but the gold lettering on the mottoe? Not so much.

As you may remember, I am looking at about 29 feet of lettering. At my current pace of 2' on a weekend day and about 6" on a weeknight that would be....a long long time. About 2 months of a long lllllooooonnnnnggggg time.

My hands hurt just thinking about it.

...but... Oooooh!, SHINY!!!

So I will persevere. If I am a very lucky girl I will get better (stronger, faster) with this process also. I sure do hope so.

To keep myself entertained in the meanwhile, I have been pondering my approach to the top most part of the center section of the Pavilion. I know it is going to be 3'x9' with the upper 1' covered with a band of the same glorious blue-green fabric I have been using throughout. I also know that I am going to be appliqueing on a period motif of a man capturing dragons (on the front of the pavilion) and my adapted version of a woman capturing (luring) them (on the back of the pavilion). I've been putting it off because I wanted to be sure that I have cut all the large continuous pieces I will need from the applique fabric before I start on the little bitsies that make up the dragon motifs.

Since I'm going to need a break from all that mottoe stitching, I guess the time is near at hand.

Monday, February 28, 2011

Ooo! More stuff from the stash

While I was poking around in my box of trims I also came across this


Short blue fringe

and this


Blue velvet, black cord and "gold" trim

I have a theory that fringed edges may help keep bugs out of the tent, so I'll probably use the fringe on the bottom of the door curtains, but where else? The doorway opening?

Would it be strange to use it at the bottom of the mottoe band, even though the tent walls don't seperate there?

And the other trim...what to do with you....

Wow. Gold ribbon? NICE......

I am so glad I looked in my stash. The ribbon is magnificent on the lettering. There is really no other word for it. It sparkles--even in the dark. It is just the right size. And strangely the weave of the ribbon even makes it look like the whole letter was embroidered in satin stitch. (But all I had to do was stitch the edges down. Woo hoo!)

I have no idea if it will hold up once it is out in the elements, but I am really glad I decided to try it out. Below, see the wonders of what cheap-o "gold" ribbon can do in the right application:


The lettering on my Pavilion, in progress

Saturday, February 26, 2011

More is More

As you have probably gathered, I come from the Guild The Lily school of stuff-making for SCA reenactment. This explains--at least in part--why I started embroidering my doorway panels on Friday. You know how it is; it snows 14 inches, you haven't decided how you are going to approach the next scheduled task (the mottoe, in my case), embroidery is *way* down the list in the 'if I have time' section of the plan but you suddenly feel like winter will *never* end and you might as well keep busy...

So anyway, I had a ball of thin black crochet cotton sitting around which I am now couching down around the outline of my applique. I've never done couched embroidery before (so I'm probably doing it all wrong) but it goes very quickly thus far (one day and I'm practically done with the first doorway panel--fire) and it makes an amazing difference!


As promised, Pictures!

In other news, I remembered that I have a large quantity of metallic gold ribbon hiding out in my fabric stash. I had absolutely zero plans for it--it was just too good a price to pass up, back in the day--so I've decided to use it to make the letters of my mottoe. I'll be stitching on two widths of the ribbon for the thick parts of my letters and one width for the thin parts. We'll see how it goes.

Wish me luck!

(BTW, if anyone wants to share a Latin translation for "more is more" I'd be very grateful!)

Wednesday, February 23, 2011

Done at last!

OK, it's just step 1, but I'm done with the applique for the doorway.

Done! Done! DONE!!!!

(Thank goodness.)

And they came out rather nicely, don't you think?


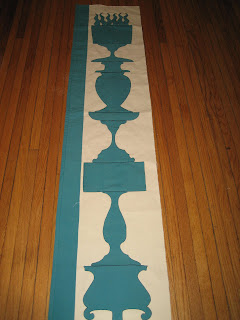
The completed applique on the four door panels

I needed a bit of inspiration to continue going forward, so I decided to lay the door way out on the floor for more pictures. Keep in mind that the *actual* tent will be 6 feet wider and 3 feet taller--and three dimensional--but here is a taste of ...


The front door of the Pavilion

and


The back door of the Pavilion

To keep up my tradition, here are detail shots of the last two elements:


AIR

(which you may notice got a small bit of trapunto) and


EARTH

As I said...Done! Done! DONE!!!!

Now on to the next stage of the plan...the Mottoe.

I've been cutting out the pattern pieces for the text and I've been slowly and reluctantly coming to the conclusion that maybe I should rethink the idea of applique for the mottoe. I'll make the final decision when I go shopping for materials this weekend, but at the moment I am leaning towards embroidery after all. (It's all the fiddly bits on the letters.) Stay tuned!

Saturday, February 19, 2011

Inspiration

A link to a site which has captured my imagination, answered my questions, and beguiled my time on many occasions...


Support disk after conservation

http://www.dhm.de/restauratoren/zelt/start.htm

It is the diary of the Deutsches Historisches Museum conservators restoration of a Turkish tent captured in 1683. (But dated earlier as I remember.) The links on the left go to German text, the ones on the right are in English.

Absolutely beautiful!

More importantly it is full of details on the materials, construction, conservation and erection of the pavilion.

And, as I said, absolutely beautiful!

Thursday, February 17, 2011

In other news...

Last time we had the camera out I also took pictures of some of the other (semi-completed) parts of the tent. I am still stitching away on the AIR panel and so, since I have nothing new to report on my door panels, I thought I'd post them.

The Piece That Started It All


Yes, this is one of my 2 triangles of assembled pieces which I mentioned in my first post. The bad news is that I still need to figure out how to extend it by about 3 feet in length but the good news is that I have an idea!

The Awning / Door Flap /Front and Back Wall Pieces


I have two of these. They just need the banding on the bottom edge and they will be ready to sew into the center section of the tent...as soon as everything else is ready.

I'm also including detail shots of the banding


Back to work for me!

Wednesday, February 16, 2011

Stage Two: Mottoe

As you may remember, the doorway panels are going to be attached to a 1' deep header. This band of blue-green will run the entire circumference of the tent (at 7' up) and Clarence and I have been searching for months for the proper mottoe to put on it. After much deliberation we have decided on:

INCEPTIS GRAVIBUS PLERUMQUE ET MAGNA PROFESSIS PURPUREUS LATE QUI SPLENDEAT UNUS ET ALTER ADSUITUR PANNUS

Which we understand translates as " In serious works and ones that promise great things, one or two purple patches are often stitched in, to glitter far and wide." (Horace 65-8 BC)

I love it.

I'm planning on doing each individual letter in applique (of course) because I just can't see myself taking on the project of embroidering all 29 +/- feet and finishing it before Pennsic...or this year...or ever!

***

I just need to finish up the applique work on AIR and EARTH before I can move on...

Sunday, February 13, 2011

I spoke too soon...New Pavilion photos are here

As promised, a full length shot of all four door panels thus far. The dead twig-ish thing in the third panel will be a tree (EARTH) as soon as we finish the step I left off of my previous list:

?) Lay the panel on the floor and stare at it and fiddle around with the pieces while Clarence figures out how we are going to make the symbol to represent the element...and we talk about it...and look at pictures...and talk and fiddle some more.

Not that I am saying he is the Spike to my Harmony, but we have a division of labor agreement going on...


Here is a detail shot of the fountain on the WATER panel .


Oops! forgot the Camera!

Well, the plan was to post lovely pictures of my 4 door panels so that you could see the progress. I've finished the applique on the second panel (WATER) and almost finished all the prep work on both of the remaining panels (AIR and EARTH) so I am definitely moving faster than in the beginning. I'm really happy with my progress and I think you will be too...If we just remember to get the camera!

Thursday, February 10, 2011

Thoughts...OK, questions really...on Pavillion poles

First let me say that I believe that the most common structure for holding up a double belled wedge pavilion (in period) was very likely two poles, one at each end of the center section.

That being said, I'm pretty invested in making a "swing set" style structure because I like the flexibility of having all that open space. I'm also pretty sure I want to go with bamboo for my support poles. Mostly for the "green" characteristics of bamboo, but also for their strength, lightness, non-conductivity (in case of lightning!) and proportions similar to a classic pavilion pole.

I see lots of indications that bamboo tent poles are(or were) common in India, and I've seen some very interesting sites about the use of thinner bamboo poles in place of the shock-corded fiberglass poles common in modern tentage, but unfortunately I've yet to find any suppliers of *just* the bamboo poles for a pavilion, or any pictures of the connectors used for larger dimension bamboo tent poles, or anything which compares the strength of bamboo to a wood I am more familiar with (like say, pine) etc, etc.

I'm just a flood of questions.

Wednesday, February 9, 2011

About the applique...

It occurs to me that I should talk a bit about how I'm doing my applique, just in case someone else would find it useful.

I got the idea for the candelabrum form from the examples and text I found in the book The History of Decorative Arts: Renaissance and Mannerism in Europe edited by Alain Gruber. Apparently it is a classical design theme which was extensively used in the later Renaissance period due to an upsurge of interest in grotesques following the discovery of some ancient frescoes in Italy. It works for my purposes because of the overall shape, and because it is basically just a whole lot of stands, basins, plates, tazzas, urns and candle holders stacked on top of each other.

I decided to cut some appropriate shapes out of paper and stack them in various ways until I liked the look, then use the selected pieces as patterns.

The process is:

1) fold piece of paper in half and draw/cut out 1/2 of a tazza or other form


2) lay various forms onto my (doorway) panel and play with the design until perfected


3) number each piece for order and direction so I will be able to recreate the design

4) pin the pattern pieces to my applique fabric--leaving about 1/2" of space between them for seam allowance


5) cut the pieces apart (remembering to leave the seam allowance!)

6) draw around each pattern piece


7) remove pattern and hand stitch around each applique section staying just inside the drawn line (This stitch line ends up being the outside edge of the finished applique piece)


8) clip the seam allowance in the curves as necessary to make the edges turn back smoothly, then turn, baste and press all the edges


9) pin the prepared applique pieces to the panel--referring to the notes re order and direction as needed

10) stitch the applique to the panel


11) remove the basting stitches from the applique

12) do happy dance!

13) repeat as necessary

There are methods for doing applique which would sew the paper pattern into the tent--sandwiched between the two layers of fabric--but I prefer this method, and I get to keep the pattern pieces and use them again for the next panel.

The first panel took just over a week for the whole process but the second one is going much faster--a lot of which is probably due to my developing callouses on my fingers. Canvas is hard stuff to sew by hand!

(Additional pictures posted 3/27/2011)