The side pieces and gores are all sewn together and the Camicia is looking pretty good overall. I wouldn't call it 'supportive' but it fits well, and controls boobage overflow At the top of the bust very nicely. I'll try for more support in my next Camicia but I'm moving on for now.

Next steps are to finish the seams, attach sleeves, and hem it up.
Entry #25 - 7/14/2012
I've been musing about the possibilities of making a Camica which functions as a supportive layer for the bust. It occurs to me that we have no idea of the size and shape of the women who wore the extant Camicias which remain from the 16th century. It seems generally assumed that the more fitted style was still worn pretty loosely...but it is certainly *possible* that they were a closely fitted garment worn by a larger woman than assumed...hmmm
I decided to try making such a hypothetical supportive Camicia and this is my progress thus far:
IRCC II chemise
Across shoulders 15" + 2" = 17"
Length 46" + 2" = 48"
I want the fabric and lace to connect 9" from the shoulder point in back so:
Center back strip of fabric is 48" - 9" = 41" x 17"
I want the fabric and lace to connect 11" from the shoulder point in front so:
Center front strip of fabric is 48" - 11" = 37" x 17"
I will need to add enough width at the sides to watch my waist measurement:
52" - 15" - 15" = 22"
And I want to divide it into four panels, two on each side:
22" / 4 = 5 1/2" plus 2" =7 1/2"
Which makes my side front and side back panels either
48" x 7 1/2" or 41" x 7 1/2" depending on whether or not I want them o stop at the armpit, or possibly 59" x 7 1/2" if I want to incorporate the inner section of the sleeve all-in-one-piece. Hmm.....
I think I'm going to go with a single strip on each side:
46" + 46" + 2" = 94" So my 2 pieces are 94" x 7 1/2"
I think I'll go with 96" so I have some wiggle room for matching the edges in case the lace length varies.
It will go from the front hem over the shoulder to the back hem.
Side neckline is 9" + 11" = 20" minus the depth of the lace at the bottom neckline ( 5") that would be 15" or about 6 sections of my lace
I've machine basted a row of stitching 1/2" in from the top edges of my front and back panels, and for the center 20" of the side panels. I then turned the fabric on the basting line, turned it again and stitched it down by hand to hem the neckline.

I then pinned on the lace, and stitched it in place.

I then turned up the lace and attached the shoulder-strap sections of the neckline, essentially making a lace yoke.

I've begun adding the gores to the lower portions of the side front and back seams. I hope to finish up the whole thing tomorrow!
Entry #24 - 7/12/2012
Layer 3, Item, one loose gown, black wool with gold braiding, shag lined.
It's hard to believe it, but I'm DONE with layer 3!
I've been posting on my main blog page and neglecting this one so we've skipped a whole lot of small progress updates but here it is in all it's furry glory.
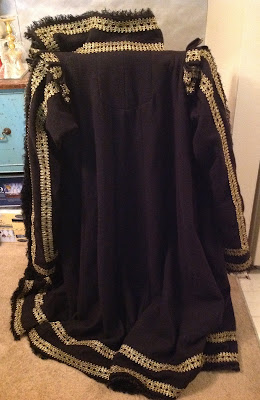
The biggest lesson I've learned is probably that it would be easier to start with whole cloth (but not as thrifty!), followed closely by the fact that I should be more careful to make a couple of consistent guide marks on armseyes and sleeves, especially when I'm not working with a pattern. Getting the tabs and sleeves set in similarly on both sides has been rather a challenge ...
But it's done now!
:)
Entry #23 - 6/3/2012
I've gotten all four rows of gold braid attached to my first sleeve in some fashion. Half is only pinned at this point but I thought I'd share anyway. :)

Entry #22 - 5/28/2012
I've been away visiting my jessi in Baltimore so it wasn't until today that I began to work on my IRCC projects again.
I've been secretly scheming about bloomers and today I started work on mine. To make them I bought a pair of vintage pillowcases with a band of drawn-thread work. I plan to use one case for each leg and simply add a gusset for the thigh/crotch section. This should make a shape very similar to the known extant examples.
So far I've just unpicked the original seams on the end of my pillowcases, but I think they sure will be pretty!

Entry #21 - 5/20/2012
As any of you who regularly read my blog have no doubt noticed, I am rather fond of patterns. In fact, it would probably be fair to say that I have taken it as my personal mission to introduce more examples of period-appropriate pattern in the garb at reenactment events. Unfortunately, one of the things this has meant is that much of my wardrobe is made of upholstery fabric which is much too warm for an outdoor event in the middle of summer in the US.
I've been starting to search my local fabric store for printed cottons which would work for lightweight summer gowns (no luck so far) but last week I had another lucky e-bay shopping moment and acquired a length of printed linen--almost 5 yards long--in a pattern which is not only perfect for late sixteenth century Venice, but also for testing out my pattern/concept/technique for my IRCC II dress before I cut into the silk!

Pretty, yes?
In other news, I have been piecing and patching and stitching and altering and the sleeves are beginning to come together. (I'll put up pictures after the braid begins to go on.) I've also given in and started work on the camicia. I think I may try to do macramé lace on the neckline and/or cuffs so I'm just unweaving threads at this point, but I find it interesting that the even-weave linen the embroidery was done on seems like it wll be much more suitable for this project than the fabric I used for the veil I started for the 'Over and Above' challenge because the threads are pretty much the same size in both directions.
Entry #20 - 5/15/2012

As promised, picture!
Tonight I am working on lining the collar with fur.
Entry #19 - 5/14/2012
My home internet is currently down so no pictures today, sorry. :(
The good news is that *progress has been made*! The loose robe is now fully lined, the shoulders are properly fitted, and work on the collar has commenced.
I'll post pictures as soon as I can.
Entry #18 - 5/8/2012 6:30 p.m.
I'm trying to produce a completely finished outfit this year so I've been trying to be reasonable about the amount of hand work I will be able to get done. When it comes to embroidery I think the realistic answer is "not much" so I have been considering alternative approaches to an embroidered camicia...vintage linens!
I have yet to find the period knot pattern of my dreams (in which said knot pattern would be done in blue silk on white linen, by the way) but I have found some lovely options on-line. Including this

My plan is to remove the center section (which is very convieniently stained, so I don't feel very guilty) and use it for the neck opening, then add properly hemmed rectangular panels and gores to make an embroidered camicia. If I get ambitious I may add some embroidery along the seam lines, and/or some lace at the neck, cuffs and hem. I think the panel is long enough for me to remove a cross-section to use as the cuffs so even if I don't get to further embellishment I think I'll be feeling pretty fancy, and since there are extant examples where the embroidered bust portion of a camicia is pieced onto a body of another fabric I even feel pretty authentic!
Entry #17 - 5/8/2012 12:07 a.m.
I lined almost another 1/4 of the loose gown (making 3/4 total) and in the process I discovered that I didn't buy enough of my fur for the entire lining. I'll need to get about another yard and a half to fill in the missing sections on the back and the sleeves. It's a bit cooler around here so I can actually appreciate how warm and comfy this gown will be.
Entry #16 - 5/5/2012
New plan, work on the robe when it's cooler out!
I got up early enough that I could still stand to be touching all that wool so I went straight to work stitching on the new additions at the neck and shoulders. I think we're getting somewhere!

Now to start on the fur before it gets too hot.
Entry #15 - 5/2/2012
I finished filling in the armpits and now I'm working on adding fabric to piece together the shoulders of my loose gowns.
However, my big news for the day is that I found a lovely book "El traje y Los tipos sociales en El Quijote" (Carmen Bernis, 2001) which contains a lot of lovely paintings I hadn't seen, a gajillion patterns for variations on loose gowns, Ropas, capes, robes, sottanas, and...veils.
Yep. Veils!
I'm gonna be making one of these...

(NOTE: I took a first stab at translating the text on this page. You'll find it in the entry for May 4, 2012 in the main blog.)
Entry #14 - 4/29/2012
I've closed up both of the pocket slits (one rather more nicely than the other) and moved on to filling in the armpit of my gown. Since the original coat pattern flared out from the waist to the armpit I started by straightening out the seamline which took the chest in about 4" total. Then I started to play with my bits and pieces from the coat disassembly...hmm.
After some playing about with sections of the original front facing it occurred to me that the tops of the original raglan sleeves were entirely unnecessary for the new coat. They were going to have to be removed anyway...

And when reversed they were just about the right shape to fill in the armpits!

Of course, I did have to take out the curve where the sleeve fit over the shoulder. (Light fabric inserted so you can see the effect of the new straight seam.)

Entry #13 - 4/26/2012
Let's see...
And finally, tonight I stitched closed one of the pocket-slits and began the ritual washing of the lace. My lace is lovely but it's rather dark for my purpose. It arrived as a very dark beige and after an evening of soaking it is...a grey-ish, white-ish beige color. I bought white linen for my camicia so I need to get these two fabrics to come together color-wise.
Wish me luck.
Entry #12 - 4/26/2012
See, it's done!

Well, the gold braid at least. I had to lay it out on the floor of the hallway and go upstairs to take the picture so please just look through the railing.
The detail shot gives a pretty good picture of the next steps; I need to close up the former pocket slits, fill in the armholes, shoulders and neckline and fit the gown. Busy, busy!

Entry #11 - 4/26/2012
O.K. It's 12:33 in the morning here but...
Gold braid finished on hem? Check!
I'll try to get a picture when I get home from work tonight.
Bed now!
Entry #10 - 4/24/2012
I've got about 1/3 of the hemline's gold braid stitched down in the sets. I'd complain about how long it is taking but I have no one to blame but myself! I do love how it looks.

Entry #9 - 4/22/2012
Today I turned and stitched down the edges of the front opening and hem of my loose gown. This was wonderfully satisfying in comparison the the rather long process of altering the gold trim.
I have nearly finished both bands on the second side of the front opening. I think I'll get it finished tonight and then tomorrow I'll be hard at work on the hem line bands.
Goody. :/
At least it looks great!

Entry #8 - 4/22/2012
More shopping today (well, yesterday really). I used another 50% off coupon and bought a wonderfully 'silky' feeling faux, faux, faux fur for the lining of my robe. In appearance it reminds me a lot of the shag lining of one of the robes in Patterns of Fashion so, while it wouldn't have been my first choice, I'm satisfied that the overall effect will be good.
I've got all four rows of trim attached and I'm currently alternating between altering each pair of rows to better integrate the braid, and turning and stitching down the edges to finish the hems prior to attaching the hemmed lining.
I've been reading for a while that a period practice was to finish the edges of the fashion fabric and lining separately and then attach the two layers together using slip stitch so I decided to finally look it up. It turns out that slip stitch is very like the stitch I "invented" in high school to invisibly attach two fabrics together.
I always suspected that the choices people make when faced with a problem, fabric, needle and thread were often pretty similar. I rather like knowing that the proper 'documentable' stitch is the one I would have used anyway!
My first weekly update has been sent in. Now it's time for me to get back to work.
Entry #7 - 4/21/2012

Entry #6 - 4/19/2012
I wasn't feeling well yesterday so I got zero sewing done and thus no dress diary update for you! I expect to be sewing tonight but right now I am musing on my process/progress with my loose gown and I thought I'd share.
It's interesting, starting from behind (or reverse) if you will. Since I'm starting from an old coat I have a lot of edges I bump into whenever I think about what I am gong to do. I only have so much fabric and since I want the gown as long and full as possible, keeping to the original hem shape was one of my earliest decisions.
Then, since I want to maximise the length (in case I do make chopines) and I may have to cut down the shoulders/neckline to convert it from raglan to a normal cut I decided to let down the existing hem as far as possible. I placed the bottom row of trim leaving just enough fabric to turn up and stitch. I plan to make and finish the lining seperately and then join the two together following period practice. (For my first time with linings!)
The front opening too is an existing limit so after I removed the facings and closed (patched) the buttonhole I went right on to trimming the outer edges.
The weight of the gold braid realy changes the drape of the fabric so I'm glad I decided to wait to work on the shoulders and seams. The coat always fit really poorly at the neck and removing the sleeves/opening out the back pleat has brought to the fore just how badly it fit in the torso too! I expect to change every seam line (as well as adding fabric to reshape the shoulders and armpits.
While I have considered the possibility of a sleeveless robe, I think I will hold onto the plan for sleeves until (unless) I discover that I won't have enough fabric to do them justice. I like the idea of a pair of long slit sleeves simply dripping in gold braid...
I've almost finished stitching down row three and I hope to pin on row 4 tonight.
I hope your projects are going well too!
Entry #5 - 4/17/2012
Oh, you know. Measure, measure, measure. Pin, pin, pin. Stitch, stitch, stitch. It goes.
I'm thinking a lot about muffs. If I have enough scraps left after I get done piecing together my loose gown I think I'll go for at least one.
As to the loose gown? Well, I DO like how it's starting to come together.

Entry #4 - 4/16/2012
Cooler weather today so I've spent the evening working on the trim. It looks like I'll get the second row attached tonight and I'll probably get a start on row three too (yippee!) but all this sewing leaves me a lot of time to ponder questions like "hmm, what am I going to do for a lining on this?", and "Oowie! How long is it going to take for my sewing calluses to come back?"
Only time will tell with the calluses but as to the lining I am torn between choices in both style and price.
As of yet I have spent absolutely nothing on this loose gown. All the supplies so far have been in my stash for quite a while (even the thread) and I'm rather amazed at my thriftiness. Which leads to thoughts of inexpensive linings...
On the other hand, I expect the overall effect of the robe to be rather magnificent, and it could be argued that not spending on the outside leaves more cash available for the inside!
So, my lining: furry or slippery, cheap or ...well, not!?
My local fabric store has dreck for faux fur, but a rather nice "shag" which feels very nice...
And there is a wonderful looking white fur with black guard hairs at I'm stuffed fur...
Or silk or faux silk are always options.
(sigh)
I guess part of my question to myself is whether this is the loose gown which will complete my wardrobe or a jumping off point? I really don't need TWO fur lined loose gowns. (Truthfully, I didn't need a second loose gown. But I had the coat which needed recycling, and I have to make a layer three so here I am...)
Hmmm....
Entry #3 - 4/15/2012
It got really hot here today which made sitting around buried in wool rather unpleasant. I got some stitching and pondering work done anyway but it was slow going! I've realized that I'm going to have a hard time not making decisions about the loose gown based on my modern aesthetic rather than my period eye. I love the broad swath of gold putting two rows of my trim created. But they don't realy feel right to me. I think they would look more period if it was either a wide band of trim or I had separated them.
After some pondering and playing with the loop of the current trim I've decided it will look much better if I do some ornamental stitching after the trim is attached to unify the two pieces. I may have to do a sampler of options.
I also decided to leave a gap before adding any additional rows of trim. I'll probably move over 2-3 inches before I put down another set of two rows.
It's nice not to have to worry about running out of trim. I bought at least two spools of this black and gold on eBay several years ago and I'm barely making a dent in the first roll!
Entry #2 - 4/15/2012
Fascinating. I spent most of the day ripping apart my old winter coat and starting to reassemble and trim it. The original coat was raglan sleeved and had a back pleat that started about 8 inches below the collar. Add in the pockets and button and it's clear that I'm going to be doing a whole lot of patching, piecing and revamping to get the style I want.
When I look at the effect of the trim going on it seems all that work will be well worth it!

Apparently I need to get some sleep before I try to take pictures, but this is the opening an hem of my loose robe with the first line of stitching on 1/2 of the braid. I think I'll end up doing 4 rows of stitching on each row of braid, and probably 3 or 4 rows of braid so I am looking at a lot of hand stitching.
Sparkely!
Entry #1 - 4/14/2012
Well, we're off an running! It's a bit over 2 1/2 hours past the starting time and I got right to work in the best possible way...shopping!
I am now the proud ('cause I actually used a Joann's coupon) owner of 3 5/8 yards of 100% wool felt. I realized that with my beautiful silk fabric I'm going to need to use the real deal in all of the construction layers. Wool felt for padding...check.
My first project is actually my layer #3: a loose gown. Now that Spring has officially sprung I am tearing apart my several years old winter coat and remaking it in a more 16th Century image. more later!
**********************************************************************************************
Prequel:
Since I liked the diary format I used for last years competition I've decided to make it my personal tradition!
(Don't you like the phrasing? I feel rather Gilbert & Sullivan. I may just break into song...)
Look here for semi-regular entries Starting on April 15th.


