Showing posts with label Veil. Show all posts

Friday, January 9, 2015

Turning Heads Challenge: What to do?

I'm just about ready to throw my hat into the ring and join in the adventure of the "turning Heads" challenge over on the Realm of Venus. The quandary is...what to make?

I admit to a rather strong fondness for the fancy jeweled headbands seen on some period portraits, but I have noticed that the ladies in the Venetian portraits I favor seem to sport unadorned hair--perhaps to focus the attention on the wonders of the hair itself--while the jewels seem to be more worn in other areas of Italy. Hmm. The truth is that a sneaking suspicion that my jeweled headband isn't accurate for Venice would in-no-way prevent me from wearing it! :) Possibly giving rise to the erroneous belief in other that such a thing was accurate... Bad reenactor!


So, do I make one of these lovelies, or keep myself from temptations way?


Another strong possibility is a pair of glasses. I would love to have glasses that I felt free to wear at events because they *added* to the event, not just because I needed them to see. And I will be taking an enameling class so the project might fit right in...I might even take on making an enameled case! 


And I have such a love for these lace veils. The idea of making one has definite appeal...


Finally, It would be difficult to find an item more authentic and appropriate than a hairnet. A simple *netted* silk hair net strikes me as being the equivalent of period style shoes. It is another ubiquitous item that most people do without, but which would totally elevate the authenticity of my presentation. and (unlike shoes) it's not even expensive or all that difficult to make!

As I said, what to do....?


Saturday, August 17, 2013

IRCC3 - Whew! It's over and I am TIRED!

I'm also not done, as my bodice has yet to be started and the camicia embroidery project may well outlive me, but I finished my final report and can now rest and speak to my husband for a few days before recommencing. I think he will like that :)

Saturday, July 6, 2013

IRCC3 Layer 4c - Veil finis!

Or, rather; Il mio velo è finito!

I am saving the final 'as worn' photos for the unveiling of our finished projects ('Unveiling!' Get it?) but here is my new veil in bits and pieces.

The shape:

I've been pondering the shapes of veils in the Spanish tailors book, and the intriguing veil ends which continue up over the chest to tie behind the neck in some illustrations, and the basic 'no waste' thought process which underlies rectangular construction methods...smooshed all together. I took my rectangle of veil cloth and folded it in half--head to foot--and then found the midpoint on each side. I cut a swoopy s-curve shape from the center back fold line to the mid-point, pivoted and attached the pieces to the main body and created a HUGE sorta semi-circular veil with long tails.


I hemmed the edges with repeated passes of zigzag stitch and folding (taking advantage of the opportunity to straigten the edges as I went along)


and then braided the dangling threads at the tips. I think the braid puts the excess thread to good use, extending the length of the ties and making a cord that will be very easy to tie behind my neck.


In the end I am hoping for a semi-circular version of this


As a final little trick, I adapted a ruff-making tip I learned from Noel Gieleghem's excellent ruff-making directions and stitched a small marker at the center point of the leading edge of my veil. It's not really noticeable but I can feel it when I run the edge of my veil through my fingers and I'm sure it will help me keep it centered when I'm pinning it into my hair.


Sunday, June 23, 2013

"What's that?" you say. That, my friend, is a big heap of veil!

I'm a natural fiber girl, by preference, but I'll make exceptions for a synthetic fabric that really gives the feel of what I'm trying to represent. Thus, after I became enamored with striped veils during the IRCC2 I snapped up a remnant piece of sheer curtain fabric that hit nearly every point I was looking for. It's an off-white to complement my complection and hide dirt, it's really sheer, it has widely spaced stripes, and those stripes have depth in comparison to the rest of the fabric. Although I would have preferred a silk with a stripe of black or gold, at a width of 110" and a price of about $1.50 this was the perfect fabric!

One of the nice things about not even starting projects you planned to do for an IRCC is that sometimes they are still waiting when the next one comes round. Today I took a little look at the veil patterns I found last year, took up my fabric and scissors and set to. I've only got the first seam finished but I am loving the look of the fabric and feeling good about the shape. I can hardly wait to see how it comes together!

Friday, May 4, 2012

IRCC II - Veil Patterns, Working on a translation

It's amazingly hot here (for the beginning of May) and I melt faster just *thinking* about working on my loose gown. So I'm not!

Instead I've been working on a translation of the text which accompanies the veil images I posted on my "IRCC II - Stitch by Stitch" page. According to google translate the closest I could come to the texts on my ipad translate like this (and I've added my guesses too):

[287]
Patrones para "mantellina o rebociño de damasco" calcados del libro de Fracisco de la Rocha de Burgen, Geometria y traca perteneciente al oficio de sastre, Valencia, 1618.
El sastre advierte: "la parte yzquierda ha de yr flores arrba por ocasion que se suele echar por debaxo el braco derecho la una delantera y asi es bien que vaya la parte izquierda flores arriba"..

Patterns for "damask rebociño mantellina or" traced the book Fracisco de la Rocha of Burgen, Geometry and fireworks belonging to a tailor, Valencia, 1618..
The tailor warns, "the flowers r yzquierda must arrba per occasion that is often cast by braco vnder the front and right one is so good to be the top left flowers."


I'm thinking that this has something to do with how the curve of the outer edge would fall in rippling folds on either side if the top center was placed on the head...

[288]
Patrones para un "manto de seda para muger". Pagina del libro de Francisco de la Rocha Burguen, Geometria y traca perteneciente al oficio de sastre, Valencia, 1618.

Patterns for a "woman silk robe." Page of the book of Francisco de la Rocha Burguen, Geometry and fireworks belonging to a tailor, Valencia, 1618.

[289 & 290]
Interpretacion de los patrones del manto de seda para mujer de la FIG. 288, siguiendo las instructiones que de el sastre, que tienen algunos puntos oscuros. La pieza de tela extendida, que mide unos once metros de largo, se dobla primero en uno de sus extremos a lo ancho para sacar el patron de la FIG. 289, que resulta duplicado. Despues, doblando varias veces la tela restante a lo largo, se van cortando las piezas que componen el patron de la FIG. 290, igualmente duplicado. Estos patrones resultan, pues, de tela doble, lo cual se explica dado lo extraordinariamente finas y delgadas que eran las sedas empleadas en estos mantos.

Interpretation of the patterns of women's silk mantle of FIG. 288, following the INSTRUCTIONS that of the tailor, who have some dark spots. The piece of cloth extended, which is about eleven meters long, is bent first in one of its ends in width to make the pattern of FIG. 289, which is doubled. Then, bending the fabric several times remaining lengthwise cutting are component parts of the pattern of FIG. 290, also doubled. These patterns are, therefore, double fabric, which can be explained given the extremely fine and thin silks were used in these garments.

[291]
Las imagenes de algunos mantos femeninos muy particulares de los que se puede dar por seguro se correspondian con los incluidos por el sastre Rocha Burgen en su libro, nos permiten imaginar como si se disponian los patrones de las FIGS. 289 y 290. El resultado era como si se Ilevasen superpuestos dos mantos de distinta forma, que no sabemos como quedaban unidos; los extremos del que iba encima se unian delante, donde se recogian con una mano (ver FIGS. 292 y 293).

The images of some very particular female garments that can say for certain is corresponded with those chosen by the tailor Rocha Burgen in his book, allow us to imagine as if were preparing patterns of FIGS. 289 and 290. The result was as if two overlapping sheets Ilevasen differently, we do not know and were joined, the ends of which was joined up front, where they gathered with one hand (see FIGS. 292 and 293).

I think it's saying that the big oval veil and the veil shaped like a slice of bread were worn sewn together, the smaller layered on top of the larger whose outer tips were held in one hand. Looking at illustration 292 I can see it as a plausible explanation of that particular veil, but I haven't noticed layered veils in Venice...I'll have to go look!


I'd say there's still a way to go on the translation, but it's a start!

I'm currently leaning towards basing a veil on fig. 287 but I guess we'll just have to wait and see what fabric I come up with since the quantity of veil fabric will have a lot to say about what shape I can make.

Wednesday, February 8, 2012

Tasty Nibble #20

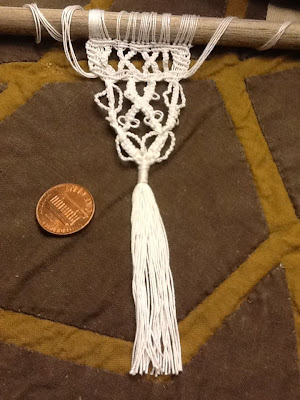
I haven't nearly finished pulling all the fringe on the first edge of my veil, but I've followed in my usual impatient path and started a section of the macramé, voila!

Here it is with my test sample, for perspective.


I'm working the pattern using 3 strands of the warp of my veil fabric for every one thread of the test sample and you can see how teeny tiny this is going to be. Hopefully I will get better at it...

Thursday, February 2, 2012

About that challenge...

Yes, I am working on it. Yes, it is going really slow. We're not talking treacle slow, more like cold tar. (sigh)

I'm pulling thread to prep the fringe for knotting. Over and over again.

I won't bore you with pictures.

The only bit of interesting news is that the actual thread of my linen cloth seems to be about 1/4 of the thickness of my test piece. If I stick with single threads this lace is going to be teeny tiny itty bitty wee!

Wednesday, January 25, 2012

Macrame Sample: What do you think?

I noticed while I was working on my test sample that the pattern for the points in the extant piece is clearly a few threads larger than the blocks-and-knots section, and the original blocks are proportionally larger (wider) than mine. Maybe 12 or 16 threads wide instead of the 8 threads I use.

Still the sample is finished and I'm pretty happy with the result.


I'll probably try crossing the threads at the top and bottom of the knot sections to help the illusion that they are loops of cord and I might make the crossover in the center of the point shorter by 1 square knot. I'm generally not interested in making exact copies of anything so I think I am content with my symetrical pattern. It will certainly be easier for me to work!

It looks like I will need to fringe about 18" of my fabric to get enough free thread to work the macramé and tassle. I'll end up cutting off about 5" of thread in the end but I think I'll need that much (plus the 4" from the tassle) to be able to manipulate the threads.

Providing that I can lay my hands on a 4 yard piece of sheer-ish linen fabric I think I've found my Over and Above Mini-Challenge project.

Tuesday, January 24, 2012

Over and Above, It's a go!

The Realm of Venus "Over and Above" mini-challenge is officially going forward so I guess I'd better decide what I'm going to be making.

I've been working on a test version of a macrame pattern using the thin crochet cotton I'm using for my partlet project. It's a bit thicker than the threads of my linen fabric would probably be, so I think it will be a pretty good gauge for figuring out how much of the fabric I would have to fringe to be able to work the macrame, as well as if my looking and pondering and counting and planning enabled me to come up with a reasonable version of the pattern.


Image #377 from Ricci's Old Italian Lace, Volume 1, 1913


As you can see the pattern is basically a series of tasseled knotted points depending from a band of alternating blocks and knots.

I've gotten the band portion finished in my sample but I'm not quite happy with it. I think it needs more of a gap between the blocks of Diagonal Hitch and the knot. Maybe if I crossed the sets of starting threads on the knot? Hmmn. Something to ponder while I work up the point and tassel section.


Saturday, January 21, 2012

Concurrences: Being my musings on project ideas for the "Over and Above" Challenge at The Realm of Venus

The focus of the challenge is on outerwear, mainly coats of various sorts, but since I already have a stunning loose gown which I rarely get to wear I'm going to be working on a Venetian-style veil.

Poking about for inspirational pictures on the web has shown me that while Venetian veils share a common theme as to size (huge!) there is a great deal of variety in shape, color, texture, opacity, decoration and manner of wearing.

Shape: I see evidence of rectangles, triangles and half-circles being common veil shapes. Additionally I find several illustrations that suggest the veil may be a rectangle which has been folded across the breadth and stitched together along one of the long edges. (Thus making a 1/2 open pouch shape rather like a coif) Admittedly, the pouchy bagginess of the drape of these veils could have been achieved in other ways--such as the judicious use of pins--but I find the possibility of a structured veil intriguing.

Color: Along with black, white, and the legendary yellow, I find evidence beige, blue, gold, red, pink and green. Notably, one example appears to be a two-color shot silk organza whose overall effect is a coral-pink.

Texture: I see evidence of veils in a variety of textures, fine to coarse, plus both smooth and textured weaves. In addition, the veils appear to have a variety of 'hands' from a liquid drape to a rather crunchy stiffness.

Opacity: While I had believed that the veil would be slightly-translucent-to-opaque in most cases, it appears that the reverse may be true. In the majority of illustrations I have seen the veil material is in the translucent-to-sheer end of the range and it is frequently very nearly transparent. It should be noted, however, that once removed from the head an opaque veil simply looks like a shawl, tablecloth, or random piece of fabric drapery so it is likely that I have misinterpreted some objects that a period viewer would have recognized as opaque veils.

Decoration-Overall: In addition to the many examples of various types of woven stripes, I find hints of more elaborate patterns. Whether these patterns were confined to bands at the edges of the veil and whether woven or applied is unclear.

Decoration-Edge: Plain hems, fringe, plain lace, tassels and ornamented lace are all seen.

While there may well have been meaning ascribed to veils of different colors, etc. (the language of the veil :) ), it seems likely that, in some cases at least, the color, shape and materials of one's veil were a personal aesthetic decision.

So, I have been mulling over options for a new veil. I am on a personal mission to bring more pattern into SCA events so I rather like the idea of of a striped veil. I also really like handwork and trying new things so I've been thinking a lot about edge treatments. Hmm. What to do?

Which brings me to the afore-mentioned concurrences...

Veil Option 1:

Sheer with woven textured stripes


Mores Italiae, 1575


Mores Italiae, 1575


Agnolo Bronzino, 1550


Corded silk Organza (available on e-bay)

Veil Option 2:

Sheer with woven gold stripes


Cesare Vecellio 1589-90


Bartolomeo Veneto 1520's


Silk organza with gold stripes (available on ebay)


Veil Option 3:

Translucent with an amazing edging

I'm thinking a sheer linen with lace edging...maybe in knotwork?