
Sunday, November 25, 2012
A picture is worth, well, a whole lota words
See? Side to side ribbons holding my bustle tapes together so it doesn't look hideous from the outside!

Saturday, November 24, 2012
Thank goodness for portable posteriors!
I have been deep in the mire of a rather spectacular FAIL with the bustling of my second skirt. I started by approximating the placement which worked so well with the plaid silk, but...

Yuck!
Then I tried moving things around to lift the center lines considerably higher (in an attempt to rid myself of that rather horrible set of side to side folds) and...

Double Yuck!
I've been moving the pins, and trying it on, and getting Clarence to give opinions and take pictures, and taking everything off and trying again. Over and over.
Only to arrive at yet more YUCK!
Sigh.
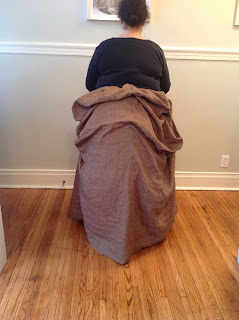
I had read the very good suggestion of draping your bustles on a dress form but since I don't have one I was stuck in the fitting loop until it occurred to me that maybe I could rig something up...and thus my Marvelous Fitting Assistant was born! (OK, created!)


Yes, that is a pillow and my bustle pinned to a high-backed chair. When in use the front of the skirt is all rucked up but it is full enough not to be a problem. And being able to make adjustments and see the changes first-hand makes a huge difference!

Voila! SUCCESS!

As it turned out, my problem was that the tapes depending from the waist band onto which the outer puffs are attached were sliding to my sides and stretching the skirt fabric into flat folds. I simply attached two short pieces of ribbon horizontally to connect and draw together the opposing points. Easy-peasey!

As Clarence commented, now my butt has a bow on it.

Yuck!
Then I tried moving things around to lift the center lines considerably higher (in an attempt to rid myself of that rather horrible set of side to side folds) and...

Double Yuck!
I've been moving the pins, and trying it on, and getting Clarence to give opinions and take pictures, and taking everything off and trying again. Over and over.
Only to arrive at yet more YUCK!

Sigh.
I had read the very good suggestion of draping your bustles on a dress form but since I don't have one I was stuck in the fitting loop until it occurred to me that maybe I could rig something up...and thus my Marvelous Fitting Assistant was born! (OK, created!)


Yes, that is a pillow and my bustle pinned to a high-backed chair. When in use the front of the skirt is all rucked up but it is full enough not to be a problem. And being able to make adjustments and see the changes first-hand makes a huge difference!

Voila! SUCCESS!

As it turned out, my problem was that the tapes depending from the waist band onto which the outer puffs are attached were sliding to my sides and stretching the skirt fabric into flat folds. I simply attached two short pieces of ribbon horizontally to connect and draw together the opposing points. Easy-peasey!

As Clarence commented, now my butt has a bow on it.
Monday, November 19, 2012
Bustle skirt #2
In a lovely brown on brown striped linen from my stash.

I'd still like to play with the bustling, and come up with a few more outfits, but since one daytime and one nighttime outfit are my bare minimum list of things I *have* to make for Teslacon I'm going to move on to bodices. Which means I need to go dig through the stacks of still-packed boxes from our move and find my corsets...
What fun. (Sigh)
Saturday, November 17, 2012
Thursday, November 15, 2012
A blast from the stash
Something like 15 years ago I found an whole lot of organza ribbon in a wonderful pumpkin pie color, CHEAP, and bought it up. I stitched it up with some lace and black cotton with the intention of making a flounced petticoat but it never got finished and I have been dragging that too-pretty-to-throw-away-but-basically-useless pile of fabric around with me ever since.
I am now quite flushed with the glow of virtuous accomplishment because it is a useless pile no longer!
My bustle petticoat in progress...

I put on my bustle and had my honey measure the waist to floor length front and back (which is 13 inches longer, by the way), took off 21inches for the finished length of the flounce, added 4 inches for a 2" tuck to cover the seam, added seam allowance and cut I piece to the front length and one to the back. I sewed those pieces into a tube (with an opening at the left side for getting in and out) and here we're pinning in the darts and back shaping/gathering to fit.
Even with the tuck turned the wrong way (up!) I'm pretty happy!
 Only 14 days to Teslacon 3...
I am now quite flushed with the glow of virtuous accomplishment because it is a useless pile no longer!
My bustle petticoat in progress...

I put on my bustle and had my honey measure the waist to floor length front and back (which is 13 inches longer, by the way), took off 21inches for the finished length of the flounce, added 4 inches for a 2" tuck to cover the seam, added seam allowance and cut I piece to the front length and one to the back. I sewed those pieces into a tube (with an opening at the left side for getting in and out) and here we're pinning in the darts and back shaping/gathering to fit.
Even with the tuck turned the wrong way (up!) I'm pretty happy!

Sunday, November 11, 2012
OMG, It's a skirt!
In fact, it's a skirt with a big poufy butt!
I still have all the handwork to do to finish it (waistband, hooks and eyes, ribbons, etc) but look, it's a skirt!

I still have all the handwork to do to finish it (waistband, hooks and eyes, ribbons, etc) but look, it's a skirt!

Tuesday, November 6, 2012
Another bit of progress
All three rows of lace are now stitched on my skirts so I thought I'd post another picture. The uppermost row is the lace just after it has been stitched and flipped over, the middle row is partway through the pinning process (I match up the corners of the pattern above and below the place I will sew the tuck, 1/2 way up the lightest row), and the bottom row is all done!


Subscribe to:
Posts (Atom)


