Oh how I love long weekends! Not only did I finish Boen's shirt, and loads of cookies, and have a scrumptious and relaxing holiday but it's not over and I've figured out how I am going to approach the partlet. At last. (Woo hoo!)
Boen likes the lacis pieces set on point best. I agree, and since it seems to be the more period appropriate approach I'm running with it. I played with the layout of my squares and decided that I am going to make the two squares on the top of the shoulders the foundation of the layout/structure for my partlet. They will be connected with a full square at the center back...and then we'll see.
I think the single square set on point will be enough depth for the back of the partlet. If so, I will probably fill in the edges with 1/2 squares of lacis to square up the back and back shoulders. I think it may take 3 full squares on each breast to provide sufficient coverage to compensate for the complete lack of upper bodice which is the hallmark of this style. I want to be able to play with it so I'm not making any final decisions about the front until the back is completed.
I'm planning to start the collar by using the inner points of the three squares which form the back and shoulders. I think if I only join the squares to about the 1/2 way point they will form an appropriate opening for my neck and the remaing points will form a nice little standing collar if I connect them with some little triangles of lacis. I'll probably have to make these pieces but at least they'll be small! I'm not sure about making a ruff as of yet. I'd like to have at least a small one to serve as under proper for a larger ruff but since I can't wear the dress at all until I have some kind of partlet it may have to be a later addition.
At any rate, the first step is to finish/reinforce the edges of my purchased lacis pieces. They have a lot of missing joins at the very edge which need mending plus I am going to be putting the finished partlet through a lot of strain so I'm running three parallel rows of reinforcement thread along/around the outer three rows of netting. I plant to stich the sections together using these three rows to anchor the work. (Fingers crossed) We'll see how it goes!
Reinforcement stiching in progress:
Monday, December 26, 2011
Saturday, December 24, 2011
Naughty, naughty!
My Boen just suggested that for today's entertainment we could just go out to a store, stand in a corner and watch!
Men who have gotten all their presents can be so mean... ;)
I'm still working on the collar of his Christmas shirt so I rather feel for the poor shoppers, myself.
Happy holidays!
Men who have gotten all their presents can be so mean... ;)
I'm still working on the collar of his Christmas shirt so I rather feel for the poor shoppers, myself.
Happy holidays!
Friday, December 23, 2011
Apparently, cookies don't make themselves.
I have been working on the last of my holiday sewing projects and am...oh about 1/2-way done with a new not puffy shirt for Boen. (At his request. Making a simple, close fitting white linen shirt with no ornamentation doesn't come naturally to me!) It's going pretty well and nicely fast considering I only discovered where the white linen I bought for it weeks ago was hiding when I was heading out the door for work on Thursday morning.
I've been stitching away all day...feeling pretty virtuous...bbbbbbuuuuuutttttttttt
We have no cookies. Not a one. Not a single cookie in the house!
I can't take it anymore.
I've been stitching away all day...feeling pretty virtuous...bbbbbbuuuuuutttttttttt
We have no cookies. Not a one. Not a single cookie in the house!
I can't take it anymore.
Wednesday, December 14, 2011
Sewing kit is finished!
And not a moment too soon, too.
(I've suddenly realized that I had better get a move on with Christmas present projects!)
Since my last posting on this project I have finished the needle lace edging and crystal bead buttons for the needle case, replaced the bottom three tassels on the original bag with larger ones, and created a scissors case and restraining cord for the clippers. Like the pin pillow and needle case, the scissors case is attached to the bag by a length of finger loop braid, but this one was anchored at the center of the bags handle so it can dangle freely and also can be looped around a belt and through the bag's handle above the bead to anchor the chatelaine securely when the bead is raised. I have no idea if similar arrangements were done in period, but it works!
And now, for your viewing pleasure:
The closed chatelaine
And open to show off the contents
I can't believe I'm finally going to have all the gear I need to sew or make repairs at events easily to hand. I can hardly wait to give it try!
Tuesday, December 13, 2011
ooooh! gotta have it!
it's possible I'm obsessed....
http://www.bildindex.de/bilder/MI07920f04a.jpg
I think I'm gonna have to try making one. :)
(BTW, I discovered the above image courtesy of the wonderful research posted at:
http://alysattewater.wordpress.com/2011/02/20/extant-medieval-hairnet-photos-on-the-web/. Thank you Alys!)
http://www.bildindex.de/bilder/MI07920f04a.jpg
I think I'm gonna have to try making one. :)
(BTW, I discovered the above image courtesy of the wonderful research posted at:
http://alysattewater.wordpress.com/2011/02/20/extant-medieval-hairnet-photos-on-the-web/. Thank you Alys!)
Better Living Through Shopping
I admit that I am feeling the teensyiest bit guilty about this (it's too easy!) but I think I've found a way to test-run a lacis partlet.
That is, to try it out and make some observations about the shape, support and coverage I will need prior to making my own lacis partlet 100% by my own hands.
You guessed it, I found some lacis pieces on e-bay. Ten of them, in fact, and each about 8 3/4" square.
They came in the mail yesterday and while they make my own poor attempts at lacis look like great hulking lumpish things in comparison (I'm going to have to look into getting a smaller gauge and some finer thread) I'm excited to skip past the 'making the lacis' stage and get right down to making a partlet so I can experiment with the 'how in the world does this work!?!' part.
Now I just have to figure out how I want to assemble them....
and then get up enough courage to wear it!
Friday, December 9, 2011
Well, my scissors (and stuff) came yesterday...
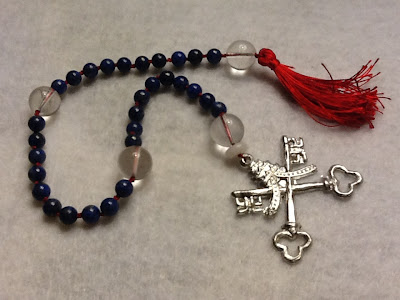
and with them came something I had forgotten about, a pewter pilgrims badge representing St. Peter of Rome (Vatican City). I bought my scissors from Fettered Cock Pewters and I got to pick a pilgrim's badge as a free gift (and you will too if you order while the special is still on.) Quite a nice holiday surprise!
Naturally I immediately started on a scissors case for the chatelaine, but my big news for today is:
Talk about projects you never expected to undertake. I went to the bead store [Danger, Will Robinson!] to get three little beads to use as buttons on the needle book and walked out with just a teensy bit of additional stuff...clear and white quartz crystal beads...and lapis beads... and some red silk beading thread...
I made the red silk tassel with a spool of silk thread I've had sitting around for ages. It's not quite the right color (aka, matching thread) but I just had to get as done as I could with the stuff I had on hand!
Ain't she pretty?
Naturally I immediately started on a scissors case for the chatelaine, but my big news for today is:
The Pater Noster I made with my new badge!
Talk about projects you never expected to undertake. I went to the bead store [Danger, Will Robinson!] to get three little beads to use as buttons on the needle book and walked out with just a teensy bit of additional stuff...clear and white quartz crystal beads...and lapis beads... and some red silk beading thread...
I made the red silk tassel with a spool of silk thread I've had sitting around for ages. It's not quite the right color (aka, matching thread) but I just had to get as done as I could with the stuff I had on hand!
Ain't she pretty?
Subscribe to:
Posts (Atom)