Thursday, May 25, 2023
Current adventures...
I have finished grad school and am just starting to peek around and notice that there is a WORLD out here. I'm excitedly planning a party and about 15 new dresses, and learning to bake even better than I used to and... More about that later.
Meantime. I just wanted to say that I'm still alive and planning to post more stuff soon. I hope you are as excited as I am!
Sunday, April 14, 2019
Another kind of glove
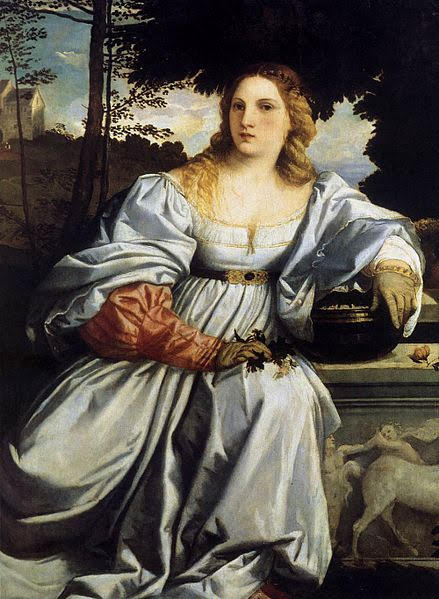
Strangely, for a girl who's SCA persona is Venetian, I am quite familiar with the Elizabethan style of gloves with large and heavily ornamented cuffs extending above the wrists, but know nothing about Italian gloves. The early sixteenth century Italian gloves depicted in my source image (Titian's Sacred and Profane Love) are clearly of another style in ornamentation, at least, and required that I look at the question of period gloves with fresh eyes.
These gloves appear to be simple leather gloves in a natural beige/grey color. Just slightly above wrist-length when worn, they appear to be ornamented by turning half the depth of an approximately 2" wrist extension inside out so the former hem is now placed at the wrist and the flesh side of the leather is exposed. I believe the resulting folded cuff of leather was then slashed from the folded edge towards the wrist, perpendicularly to the fold, in small evenly spaced slashes made appoximately 3/4 inches apart.

I love it that they look like they would be really easy to make by simply reworking a pair of commercialy available gloves, but I wanted to do some research to confirm the plausibility of my interpretation before I got started making my own.
I started my investigations by looking up gloves in the Linkspages at Larsdatter.com's collection of links related to examples of Medieval and Renaissance Material Culture.
http://www.larsdatter.com/gloves.htm
In truth, I started and stopped my investigation there, because scanning the list for Italian depictions and viewing the linked materials turned up more examples than I expected, 5 of which meet my criteria for similarity of style and clarity of construction information provided. It seems folded and slashed cuffs on leather gloves were a thing in Renaissance Italy and possibly elsewhere.

Paolo CAVAZZOLA, Verona 1486 – 1522
Portrait of a lady [Ritratto di gentildonna] c.1515-17
oil on canvas
96.4 (h) x 74.2 (w) cm
https://nga.gov.au/exhibition/renaissance/default.cfm?IRN=202404&BioArtistIRN=37006&MnuID=3&GalID=5&ViewID=2

The Lute Player
* The lute-player (St. Mary Magdalene?), first half of the 16th century
http://previous.bildindex.de/bilder/mi00272a06a.jpg

TITIAN
TIZIANO Vecellio
(b. 1490, Pieve di Cadore, d. 1576, Venezia)
Man with a Glove
1520-22
Oil on canvas, 100 x 89 cm
Musée du Louvre, Paris
https://www.wga.hu/frames-e.html?/html/t/tiziano/10/21/06gloves.html

Moretto da Brescia, 1526
A Man
https://www.wga.hu/art/m/moretto/portr_m.jpg

Agnolo Bronzino
Florentine, 1503 - 1572
A Young Woman and Her Little Boy
c. 1540
oil on panel
overall: 99.5 x 76 cm (39 3/16 x 29 15/16 in.)
framed: 134.6 x 111.1 x 6.7 cm (53 x 43 3/4 x 2 5/8 in.)
Widener Collection
1942.9.6
On View: West Building, Main Floor - Gallery 21
https://www.nga.gov/collection/art-object-page.1143.html
Based on these examples I would speculate that in this period gloves were made to extend several inches up the arm, and adjusted to suit the wearer by folding and slashing. Whether these adjustments were made for matters of taste, fit, or both, remains to be seen, but I lean towards the last option. At any rate, I searched the internet for a plain glove in a smooth, fine, tan leather, that extended up the arm a bit. Easy peasy. The gloves I purchased had a built in lining so my first task was a bit of disassembly.

After cutting the lining away from the leather near the wrist I pulled on the lining which turned the gloves inside-out because the
the two layers were sewn together at the tips of the fingers and thumb.

I cut through the stiches and removed the lining.

My gloves also had elastic gathering the leather at the side seams to give a ruched effect to the wrist area of the glove.
I reccomend removing the elastic by cutting it along the seamline and pulling the fragments gently away. If you are lucky that will leave the original side seams intact.

Another option is to remove the stitching and resew the sides of the glove.
These gloves appear to be simple leather gloves in a natural beige/grey color. Just slightly above wrist-length when worn, they appear to be ornamented by turning half the depth of an approximately 2" wrist extension inside out so the former hem is now placed at the wrist and the flesh side of the leather is exposed. I believe the resulting folded cuff of leather was then slashed from the folded edge towards the wrist, perpendicularly to the fold, in small evenly spaced slashes made appoximately 3/4 inches apart.

I love it that they look like they would be really easy to make by simply reworking a pair of commercialy available gloves, but I wanted to do some research to confirm the plausibility of my interpretation before I got started making my own.
I started my investigations by looking up gloves in the Linkspages at Larsdatter.com's collection of links related to examples of Medieval and Renaissance Material Culture.
http://www.larsdatter.com/gloves.htm
In truth, I started and stopped my investigation there, because scanning the list for Italian depictions and viewing the linked materials turned up more examples than I expected, 5 of which meet my criteria for similarity of style and clarity of construction information provided. It seems folded and slashed cuffs on leather gloves were a thing in Renaissance Italy and possibly elsewhere.

Paolo CAVAZZOLA, Verona 1486 – 1522
Portrait of a lady [Ritratto di gentildonna] c.1515-17
oil on canvas
96.4 (h) x 74.2 (w) cm
https://nga.gov.au/exhibition/renaissance/default.cfm?IRN=202404&BioArtistIRN=37006&MnuID=3&GalID=5&ViewID=2

The Lute Player
* The lute-player (St. Mary Magdalene?), first half of the 16th century
http://previous.bildindex.de/bilder/mi00272a06a.jpg

TITIAN
TIZIANO Vecellio
(b. 1490, Pieve di Cadore, d. 1576, Venezia)
Man with a Glove
1520-22
Oil on canvas, 100 x 89 cm
Musée du Louvre, Paris
https://www.wga.hu/frames-e.html?/html/t/tiziano/10/21/06gloves.html
Moretto da Brescia, 1526
A Man
https://www.wga.hu/art/m/moretto/portr_m.jpg

Agnolo Bronzino
Florentine, 1503 - 1572
A Young Woman and Her Little Boy
c. 1540
oil on panel
overall: 99.5 x 76 cm (39 3/16 x 29 15/16 in.)
framed: 134.6 x 111.1 x 6.7 cm (53 x 43 3/4 x 2 5/8 in.)
Widener Collection
1942.9.6
On View: West Building, Main Floor - Gallery 21
https://www.nga.gov/collection/art-object-page.1143.html
Based on these examples I would speculate that in this period gloves were made to extend several inches up the arm, and adjusted to suit the wearer by folding and slashing. Whether these adjustments were made for matters of taste, fit, or both, remains to be seen, but I lean towards the last option. At any rate, I searched the internet for a plain glove in a smooth, fine, tan leather, that extended up the arm a bit. Easy peasy. The gloves I purchased had a built in lining so my first task was a bit of disassembly.

After cutting the lining away from the leather near the wrist I pulled on the lining which turned the gloves inside-out because the
the two layers were sewn together at the tips of the fingers and thumb.

I cut through the stiches and removed the lining.

My gloves also had elastic gathering the leather at the side seams to give a ruched effect to the wrist area of the glove.
I reccomend removing the elastic by cutting it along the seamline and pulling the fragments gently away. If you are lucky that will leave the original side seams intact.

Another option is to remove the stitching and resew the sides of the glove.
Saturday, March 30, 2019
IRCC9 - Take a deep breath. on April first, 2019 we're going in!
I'm going to try a 1510 gown this time, based off Titan's Sacred and Profane Love. I've got nearly all my bits and bobs assembled and I plan to hit the ground running. Wish me luck!
https://en.m.wikipedia.org/wiki/Sacred_and_Profane_Love

https://en.m.wikipedia.org/wiki/Sacred_and_Profane_Love
Tuesday, June 7, 2016
CoBolWriMo 7 - The wonders of eBay!
Today's prompt is to write about a favorite resource and I've got to talk about my favorite go-to supplier, eBay!
I stared shopping on eBay in 2005 or thereabouts, mostly to feed my collection of turquoise-blue milk glass, but I slowly became aware that some truely incredible fabrics, and some great deals, could be found there. Since then I have made two major moves, relocating to vastly different places in the US and I've discovered that eBay us always there for me. :) My only local fabric store is a vastly inadequate JoAnne fabrics and I have almost zero chance of finding something I really want there, but....
Say I want six or more yards of smashing silk for a steampunk ball gown for about $60?

And it is so wonderful that I just have to find natural fiber lace to trim it. In fact I need enough to make pleated lace trim!

How does 27 meters of cotton lace grab you?

Works for me!
Or maybe I just happen to see a really great fabric and feel the need to transform it into a skirt.


Or I happen upon the most wonderful tapestry fabric and decide to drape a room in it?

Again, eBay!
I strategize a lot, and I've learned to hold out for a fabric I love at a price I love too, but on eBay I get access to some truely incredible things. You'd never guess I live far far away from the world of great fabrics.
Monday, June 6, 2016
CoBloWriMo 4 - Trip to collect supplies for Quiver
So, Tandy Leather. Such a lovely place.
I used to haunt my local Tandy leather store back in High School. I had a fantasy that I was going to make some wonderful tooled...thing... I visti the store, and stroke the leather and look at all the stamps and dyes and other mysterious stuff and just kind of drool.
It's nice to know that nothing has changed!
The closest store to me is the one in Indianapolis so on Saturday I took a day trip and ran off to the big city with my quiver i-in-process and a whole lot of questions about what I needed to purchase/do to finish it.
And they were lovely.
I did a lot of blinking, and repeating the phrase, "um, what does that mean?" but I walked out with a membership and all kinds of stuff, more dye, and deglazer, and finisher and needles and thread and punches and rings... I got overloaded about the time I was learning about rivets so I'll have to go back to get them, but I have the basics now. Whew!
So, of course, I went home and started right into it on Sunday. Meet my new quiver!

All sewn together and ready for the finishing touches.
I know I've been a bit skimpy on the process details, but I can see several new leather projects coming down the pike--maybe even some shoes--so I will get to the details. Just let me learn a bit more , OK?
CoBloWriMo 3 - Archery kit gets a new look
So ages ago (about 4 years now) I took up archery again after a break of several decades. Well, that is if to count a few hours spent doing archery in summer camp as having 'taken it up!' :)
Anyway, I made myself a quiver out of 2 liter soda bottles, cardboard, duct tape and some other stuff and those quivers are still going strong. But I wanted to up my game a bit so I've been working on a belt quiver.
It all started with a painting
http://www.warfare.altervista.org/15/Carpaccio-St_Ursula-Martydom_of_the_Pilgrims-lg.htm
And some wonderful info about a project to recreate it
http://web.archive.org/web/20070210195459/http:/www.tirbriste.org/dmir/ArmsArmor/02/0215/0215.html
I am very interested in the cultural cross-over between Italy and Turkey in the renaissence period, and the instant I saw that painting I was struck by the resemblance of the quiver to Turkish quivers. Like this one c. 1550
http://bilddatenbank.khm.at/viewArtefact?id=373802
I had to have one!
Since I have never worked in leather before I worked with a friend to cut out the front and back sides, and then the pieces sat around the house......for an embarrassingly long time......until I saw this!
It's a page from a pattern book dated 1570-ish, and there in the lower left corner is the inspiration for the design on the front panel of my quiver.

I enlarged the pattern to the right width for my quiver pieces and then made several copies so I could cut and paste and play with the pieces until I had a pattern I liked


And then I traced it onto baking parchment and embossed the pattern into my dampened piece of leather by drawing over the lines with a ballpoint pen. The parchment worked well for the tracing, but tape wouldn't stick to it to hold it in place. It shifted on the leather a bit. Something to watch out for if you try using it.


The next step is to wet the leather and score the pattern in with a knife, cutting about 1/2 way through the leather, it was scary at first, but pretty easy. Just very time consuming! And then I started tooling,

and tooling

and tooling......


I've been having trouble getting pictures to post but I'm back now! And the Quiver is almost Done. Watch for an update soon. :)
Anyway, I made myself a quiver out of 2 liter soda bottles, cardboard, duct tape and some other stuff and those quivers are still going strong. But I wanted to up my game a bit so I've been working on a belt quiver.
It all started with a painting
http://www.warfare.altervista.org/15/Carpaccio-St_Ursula-Martydom_of_the_Pilgrims-lg.htm
And some wonderful info about a project to recreate it
http://web.archive.org/web/20070210195459/http:/www.tirbriste.org/dmir/ArmsArmor/02/0215/0215.html
I am very interested in the cultural cross-over between Italy and Turkey in the renaissence period, and the instant I saw that painting I was struck by the resemblance of the quiver to Turkish quivers. Like this one c. 1550
http://bilddatenbank.khm.at/viewArtefact?id=373802
I had to have one!
Since I have never worked in leather before I worked with a friend to cut out the front and back sides, and then the pieces sat around the house......for an embarrassingly long time......until I saw this!
It's a page from a pattern book dated 1570-ish, and there in the lower left corner is the inspiration for the design on the front panel of my quiver.
I enlarged the pattern to the right width for my quiver pieces and then made several copies so I could cut and paste and play with the pieces until I had a pattern I liked


And then I traced it onto baking parchment and embossed the pattern into my dampened piece of leather by drawing over the lines with a ballpoint pen. The parchment worked well for the tracing, but tape wouldn't stick to it to hold it in place. It shifted on the leather a bit. Something to watch out for if you try using it.


The next step is to wet the leather and score the pattern in with a knife, cutting about 1/2 way through the leather, it was scary at first, but pretty easy. Just very time consuming! And then I started tooling,

and tooling

and tooling......


I've been having trouble getting pictures to post but I'm back now! And the Quiver is almost Done. Watch for an update soon. :)
Wednesday, June 1, 2016
CoBloWriMo - Oooooo......Eyes!

and with the first 5 rows sewn on....

Ooo...I like this!

CoBloWriMo! Just a little something to start out the month.
Hello Again!
It's June first for me, and Costume Blog Writing Month commences. I intend to use this month to get back to working on my costuming, and my blog...so, of course, I decided to start a huge new project last weekend!
Welcome to my world. :)
So, I registered a household badge at last and in preparing to go to a big SCA event this month I realized that there is just no way I will get my Pavilion finished in time--mundane tent for me :(--but I really want some splashy period stuff to set the scene in my encampment. I have a table and chairs but no sunshade/day-tent...and eyes! 200 custom patches I ordered during a sale last winter. So now I am making a day shade.
I am doing the canvas part all wrong, of course. Since it need it FAST I went to the hardware store and bought a heavy but 100% cotton canvas tarp (10x15) for my base. Since it is only a day-shade I hope it will be sufficiently weather resistant for my purpose.
I am working on an inner liner in red and blue cotton covered with eyes:

Tuesday, August 4, 2015
Night Circus Inspiration has Struck
Yes, it's time to start working on outfits for Teslacon again. (Past time, really.)
This year there is a sub-theme of a traveling circus which comes one night to the western town we will be visiting in the main story line. I confess I am not wildly enthusiastic about the wild west theme, but a night circus is something I can get behind!
I've been inspired by this illustration:

I just love the juxtaposition of gossamer and sturdy fabrics and the femme-military vibe. Perfect for the Circus!
There will be changes, of course. I want a fluffy bustle with lots of folds and a contrast lining, and I already have a few pieces of sequined fabric (former skirts) which I am planning on using in my frothy layers, but I'll be keeping the solid colored waist and all the military braid!
This year there is a sub-theme of a traveling circus which comes one night to the western town we will be visiting in the main story line. I confess I am not wildly enthusiastic about the wild west theme, but a night circus is something I can get behind!
I've been inspired by this illustration:
I just love the juxtaposition of gossamer and sturdy fabrics and the femme-military vibe. Perfect for the Circus!
There will be changes, of course. I want a fluffy bustle with lots of folds and a contrast lining, and I already have a few pieces of sequined fabric (former skirts) which I am planning on using in my frothy layers, but I'll be keeping the solid colored waist and all the military braid!
Wednesday, July 22, 2015
And then there was a muff - part 1
Spurred on by the impulsive purchase of a fabric sample in *just* the right colors I have been working on a new accessory for the IRCC5, a fur lined muff. And yes, I mean real fur. I'm recycling a vintage coat I was given a couple of years ago which I have been too afraid of to touch until now. amazing the courage the perfect fabric can give one! :)
My fabric scrap is too small to make the muff on it's own so my first step was figuring out how I was going to enlarge it. I decided to baste it onto a slightly larger piece of two layers of linen and cover the joins with some metallic gimp trim I have in my stash.


I actually had about eight metallic trims which I considered and I find it interesting that one of the cheapest was actually the one that looked best...and most expensive...when paired with my fabric. It reminds me that it is best not to make assumptions about these things!
As to the fur lining, when I took the fur apart I discovered all sorts of interesting things. They had used huge sloppy stitches through the hide (but hidden under the hair) to hold various facings and turnings in place, and they had made the original vents at the hem with an integral, turn-back facing stiffened with something like soft parchment or a stiff lightweight leather. This gave a crisp edge to the fur while allowing it to cleanly continue to the reverse side. very nice. I was inspired by this technique to try making a facing strip of brown paper for the edges of my muff.


Then I flipped it back using the 1/2" of paper as a guide and basted it into place while also overcasting the cut edge of the fur

Wrong side
It makes a beautifully soft clean edge (with no shedding!) so I continued the same process on the other two cut edges of my fur. The third edge of the fur has a band of leather finishing the edge which I kept since I think it will provide a nice stable place to attach the buttons and will wear well.

The facings give a lovely stiffness to the edge which I think will influence the finished muff to hold it's shape. After some consideration I decided that I wanted to add an internal layer of felt by basting it onto the front also. It helps fill in the hollow left where the front turnings end, and I hope it will keep my hands toasty.

I then placed my front piece an the fur backing--slightly off center as my original fabric sample isn't centered and I forgot to even it up before I attached it to the linen)--folded in the edges of the fur backing and stitched the whole thing together along the edge of the fur.

Next steps are to add more trim, sew the short ends closed, and add buttons and loops. Almost done.
My fabric scrap is too small to make the muff on it's own so my first step was figuring out how I was going to enlarge it. I decided to baste it onto a slightly larger piece of two layers of linen and cover the joins with some metallic gimp trim I have in my stash.

Basting

Close up of basting. It doesn't have to be neat to be effective!

I actually had about eight metallic trims which I considered and I find it interesting that one of the cheapest was actually the one that looked best...and most expensive...when paired with my fabric. It reminds me that it is best not to make assumptions about these things!
As to the fur lining, when I took the fur apart I discovered all sorts of interesting things. They had used huge sloppy stitches through the hide (but hidden under the hair) to hold various facings and turnings in place, and they had made the original vents at the hem with an integral, turn-back facing stiffened with something like soft parchment or a stiff lightweight leather. This gave a crisp edge to the fur while allowing it to cleanly continue to the reverse side. very nice. I was inspired by this technique to try making a facing strip of brown paper for the edges of my muff.
After cutting out my fur I split open a brown paper bag and cut out 3 strips of paper which were 2" wide. I marked one edge with a guideline 1/2" in and then basted it to the wrong side of the fur with the 1 1/2" edge hanging over

Right side

Wrong side
Then I flipped it back using the 1/2" of paper as a guide and basted it into place while also overcasting the cut edge of the fur

Wrong side
It makes a beautifully soft clean edge (with no shedding!) so I continued the same process on the other two cut edges of my fur. The third edge of the fur has a band of leather finishing the edge which I kept since I think it will provide a nice stable place to attach the buttons and will wear well.

Right side (but I think you knew that)
The facings give a lovely stiffness to the edge which I think will influence the finished muff to hold it's shape. After some consideration I decided that I wanted to add an internal layer of felt by basting it onto the front also. It helps fill in the hollow left where the front turnings end, and I hope it will keep my hands toasty.

Felt layer basted in place

The assembled muff
Next steps are to add more trim, sew the short ends closed, and add buttons and loops. Almost done.
Wednesday, July 15, 2015
Ooops! I've been a bad blogger! Update on subtelties at last.
The glorious feast at Three Saints and a Ruby has come and gone and I am FINALLY posting pics of the subtleties course which lead off the feast
Mice (made of hard-boiled eggs, radish slices and roots, and parsley stems), Carrots( made of cheese and parsley) , cheese (made of marzipan), and bread! I had hoped the bread would give the impression of rocks, but...not so much. Still, I think they turned out well. They were certainly well received!

We placed two platters for four on each table.
Tuesday, March 31, 2015
IRCC5 - And we're off! (almost...)
Tomorrow, April 1, 2015 is the first day of the fifth Italian Renaissance Costuming Challenge, run by Bella Lucia da Verona of the Realm of Venus.
I have lots of plans. :)
I was one of the lucky few who supported the Kickstarter fundraiser for Margo Anderson's Italian Wardrobe patterns and they are just waiting to be taken for a spin around the block. I am planning to use them for both my layer 1 (drawers) and my layer 2 (a parti-colored sottana). I'm not sure if I will use the pattern for my layer3 (striped overgown) or not. It rather depends on the fit of my layer 2. I think now that I have discovered the joys of making full gowns with 4 yards of fabric I may feel that the skirts are too full, Plus I've been longing to try out Matthew Gnagy's cutting and tailoring methods...
I may just frankenstein together a bodice drafted by his method (as close as I can infer from his book on mens tailoring) and my new Elenora-style skirt...or whatever style skirt is necessitated by my experiments...instead
The one thing I know for sure about the outer layer is that I want to try to make a striped dress. This dress, in fact!

Francesco Montemezzano
Portrait of a Lady
Private Collection
ca. 1580
I am completely fascinated by the stripes in the skirt and I want to answer the question of whether this representation was likely to have been an accurate portrayal of an actual style--or at least is possible when using ordinary striped fabric.
Not that my fabric is "ordinary!" I have the prettiest teal and gold plaid in my stash and it is very sure it wants to be this dress.

Who am I to say no?
I have lots of plans. :)
I was one of the lucky few who supported the Kickstarter fundraiser for Margo Anderson's Italian Wardrobe patterns and they are just waiting to be taken for a spin around the block. I am planning to use them for both my layer 1 (drawers) and my layer 2 (a parti-colored sottana). I'm not sure if I will use the pattern for my layer3 (striped overgown) or not. It rather depends on the fit of my layer 2. I think now that I have discovered the joys of making full gowns with 4 yards of fabric I may feel that the skirts are too full, Plus I've been longing to try out Matthew Gnagy's cutting and tailoring methods...
I may just frankenstein together a bodice drafted by his method (as close as I can infer from his book on mens tailoring) and my new Elenora-style skirt...or whatever style skirt is necessitated by my experiments...instead
The one thing I know for sure about the outer layer is that I want to try to make a striped dress. This dress, in fact!
Francesco Montemezzano
Portrait of a Lady
Private Collection
ca. 1580
I am completely fascinated by the stripes in the skirt and I want to answer the question of whether this representation was likely to have been an accurate portrayal of an actual style--or at least is possible when using ordinary striped fabric.
Not that my fabric is "ordinary!" I have the prettiest teal and gold plaid in my stash and it is very sure it wants to be this dress.

Who am I to say no?
Largess for Game Day #3 - Tablut
I am going for another strategy game this week, and a much more complicated one! Tablut is a two person game played with sides of unequal strength--sixteen brutal ATTACKERS and a small band of eight loyal DEFENDERS seeking to protect their KING. It sounds very exciting!
We need a board with a nine-square by nine-square grid. Once again I made mine in felt!
And then there are the necessary pieces and a six sided dice (just one).
I also made paper versions of the board and instructions slightly adapted from these which are kindly provided by Baron Modar Neznanich, OPel. The paper versions mean that everybody has a set of instructions handy during game night, and they can take a game home with them. (A good thing in my book.) BTW, there is a bit of method to my madness, I plan to put the games out on the tables during the day at the Three Saints and a Ruby event in May!
All in all Tablut was pretty easy and quick. Which is a very good thing since I kinda waited until the last minute. I get to play Tablut for the first time tonight! :)
Thursday, March 26, 2015
Baker's Dozen Largesse Derby - Dipping my toes back into the world of Largess
It was my great honor to receive an origami Dragon from the hands of their majesties during the Constellation Regional A&S Competition this past Better War Through Archery. It is perched on my computer monitor as I write this and every time I look at it I am reminded that small and light largesse is A GOOD THING! It is convenient for both the giver and the recipient and quite small and simple things still have the marvelous ability to make the recipient light up with happiness, even months after they first receive the gift!
I usually lean toward large and complicated largess, so my Dragon is a wonderful inspiration to try my hand at smaller things. Even if I do have to keep beating myself back from overly complicating things by adding more stuff!
One of our neighboring shires is being elevated to a barony shortly after the Three Saints and a Ruby event this May and we are holding a Largesse Derby focusing on largesse for the new Barony. We hope to be able to pass on many lovely things to the new Baron and Baroness Shadowed Stars...
And I am making pins.
Yes. Simple little brass pins. I'm actually rather excited about it because I have never made pins before, yet I have wanted period appropriate pins made of brass wire for ages! I confess that I may enamel the heads of some of them, But I WILL NOT make complete sewing kits with boxes and needles and scissors and thread-winders and a pincushion and a beeswax tablet and ...
I will not.
I am making something small, light, easy to carry and eminently useful.
I am making PINS.
Thursday, March 5, 2015
Largesse for Game Day #2 - Gluckshaus
Another month, another game!


Some people like games of skill, some those of strategy, and some like games of luck. I'm trying to cover a little bit of each, and what better game to start with than one named for the Lady herself! This week's game was Glukshaus, or the House of Fortune.
Using the information kindly provided by Dragonell the Juggler at http://www-ca.canisius.edu/~salley/SCA/Games/gluckshaus.html I made up another felt game board. (I'm working on a full set of five, but these take a while to make And since the game can be played by any number of people, we only needed one.) I bought dice at the local party store--they had them in their 'poker night/casino party' section--and also made a pretty version to print on 8 1/2 x 11" paper. Having wised-up a bit, I printed the paper boards on card stock with the instructions on the reverse so everyone who attended could take away the game.
Which many did. Score!
Subscribe to:
Posts (Atom)


