Saturday, April 7, 2012

IRCC 2 Planning. OK, I Admit It. I'm Weak.

Well, many of my 2nd IRCC gown choices have just been decided (by implication, at least) by my purchase of some fabric. Not quite as much as I'd like--there were only 4.75 yards available and I prefer to have 10 yards on hand when I start on a gown--but such stunning fabric that I just couldn't resist any longer!

I am going to make the best outfit I can based on this cloth:


In a way having such a scarcity of cloth feels authentic to me. I'm going to have to wait until it gets here to figure out how to make the best use of the fabric--I certainly don't have any to waste! And this may just be the outfit which makes me let go of my modern insistence on matching the pattern...I guess we'll see!

I have to admit that even the simplest of dresses would be amazing in this fabric.

(And it's mine! All MINE! Bwwahahahahaha!)

Friday, April 6, 2012

Things I'm wondering about

I realized that my response to comments in response to my last entry was oh-so-full of...let's call them typographical errors. So I decided to see if I could edit my comment. Being the enterprising I-will-learn-to-use-blogger,-I-will! kind of girl I am, I decided to go poke around in the features of the comments tab and see what I could do.

Presto! No more comment.

What, I wonder, is the purpose of having both a delete option and a modify comment option if the modify comment option simply deletes it also?

I'm thinking it's all about entrapment.

Wednesday, April 4, 2012

IRCC II - O.K. I'm in!

I've been pondering whether or not I was going to join in the IRCC this year.

I've realized that I don't really enjoy the competition aspect of such events and that what I'd really like to join in on is a group of people working on longer-term personal challenges to make one incredibly hand-work-intensive article. Like maybe a 4 month challenge to produce our dream camicias, or something...

Still, I find that the IRCC is a great catalyst for me to try new things, meet new people, and get some sewing done. I really like it all up until the judging!

So, pondering aside, I'm in. Now I just have to decide what I'm going to work on. I already have the fabric for several gowns in my stash but I'm torn between making up one (or possibly more) of those long delayed Venetian-style dress projects or taking on a portrait gown. I've never tried to make the best copy I could of a specific dress and it sounds...kinda fun!

Of course, the fact that the dresses I most want to copy are all crazy elaborate (for one reason or another) is rather a drawback

Hmm......

Right now I'm leaning towards concentrating on trying out new techniques. I'm happy with the support offered by a bodice with a hemp corded supportive lining but I've been wondering what the results would be of combining that technique with the support and smoothness offered by the technique of padding the bodice with layers of wool felt. Would it be more supportive? Perhaps it would eliminate the tendency of my outer fabric to develop small wrinkles?

I'm also interested in trying out the documented techniques of a period style padded, clipped and tucked hem, and maybe even padded pleats at the waist. I took on the challenge of sewing an outfit entirely by hand years ago but I'm not particularly wedded to it at this point....hmm...what to do....?

Sunday, April 1, 2012

New Skirt Stage One

So, I loved the bugs but I never did like the leafy stripes so stage one was to cut off the borders, remove the stripes in the body of the fabric and reassemble the resulting bug filled strips into a length of cloth. I've now got a chunk of fabric which is about 30" wide by 4 yards long which I intend to cut into four pieces of equal length. (Matching the pattern of course. How could I not with a design as linear as this?)

I haven't figured out the pattern repeat yet, but I hope to have a small band of bugs left to use as applique for a coordinating top. No plans yet for the two leafy stripes I took from the body of the fabric....maybe I could make a purse or cover some shoes...but I plan to use the wider border for the hem facing of the skirt.


I love the new fabric! To me it is just as loud, but somehow darkly mysterious and definitely not as clownish. My Clarence said it is weird like me. How good is that!?!

It's going to look great on a summer night.

Saturday, March 31, 2012

And the skirt is finally finished! (Well, OK. I still need to add hooks and eyes...but almost finished!)

My next step was to decide what type of pleats I wanted to use (I decided on unpressed box pleats) and then set in the zipper.

Since I wanted the zipper to be placed on the center of a pleat I opened my seamline to the depth of the zipper and pined it in place on the basting stitches from my first attempt at fitting the tube of fabric to my form. I then clipped the seam allowance as necessary and pinned the other side of the box pleat in place to fully expose the zipper on the inner side of the skirt.

Phase One


Phase Two


I also stiched on a small piece of fabric to reinforce the skirt at the bottom of the zipper.

All Stitched


Once I could use the zipper I tried the skirt on again and adjusted the angles of my pleats/darts as necessary. Remember that I said that my waist-to-floor length varies widely? You can see that take effect in the stitching lines below.

The stitching to the left is a side-back seam. Note that my waist is smaller and higher at that point than it is at the seam on the right. The waist continues to descend as it progresses around to the front of the skirt. (2 1/2" in total.) This adjustment (and my subsequent work with scissors to even out the built-in waistband to an even 3") is my usual skirt length adjustment needed to fit my figure.


I removed the original basting and tried on the skirt again, it fit well so I stiched all the dart/pleats in place, ironed them open into box pleats and 'stitched-in-the-ditch' to keep the pleats in place.


I used the same pink and white houndstooth ribbon to reinforce/face the waistband and voila!


I feel so Spring-y!


Just because I like you, here is the fabric for my next skirt project. Loud, isn't it? :)


Sunday, March 18, 2012

Skirt Progress

So, I've been meaning to write out my basic instructions for a drape-your-own pleated skirt for some time and today I decided to just go for it with this skirt.

In my last post I talked about pattern matching and sewing together a tube of fabric and hemming the skirt. Please note that for any skirt which is basically constructed from a straight tube of fabric I always sew the hem as one of the first steps. I have a lot of formal (pattern drafting class related) reasons for this, but it basically works out to this:

The Earth Is Flat.

At least it is for the purposes of dressmaking. Your ground line should always be level, and no matter if your skirt is floor length or just long enough to shock your neighbors, the distance of a straight and even hemline will always be a level line a set distance from this flat earth.

Clothes Will Hang Better If The Grain Line Of The Fabric Is Consistent.

Since I am making a straight skirt the easiest way to do this is to use either the warp or the weft of the fabric for my level line. Because of the way fabric is woven such threads should be square. I generally cut out my skirt to the appropriate length by pulling a thread and cutting along it. If a particular cut of fabric is out of true I simply pull it back into shape before I stitch the pieces together.

It's Easier To Hem While The Skirt Is Still Flat.

Seems pretty simple, but this is especially true if I am doing fancy things like embroidery or applying velvet bands to the hem of a skirt.

People Are Not Flat.

And this is the tricky bit. When I measure myself for a skirt I have vastly different measurements in my waist-to-floor distance at various points. This is absolutely normal and simply the result of being organic, bi-pedal, and curvy. Since I know the earth hasn't moved, and my grain line is straight, I know that I need to take my natural form into account and make adjustments to my fabric as necessary to get a good fit as I work up to my waistline.

To be more specific, when cutting a skirt I measure my waist to floor all around, take the longest measurement, add an additional 5/8 or more at the waist for seam allowance, add up to another 10" (depending on the weight of my fabric and the desired effect) for hem allowance, and subtract inches for the distance from the floor to where I want my hem to fall, ie, 48" + 5/8" + 5 5/8" -4" for an ankle length skirt with a 5" (after sewing) hem.

So all that part was already done before my last post. This week is all about my easy no-bake method of making a fitted pleated skirt with no pattern and a minimum of measuring.

Step 1:

Take your hemmed skirt tube and step into it (put it on) holding the waist up to an appropriate place and pin the fabric so your tube fits comfortably at the widest part of your hips. One pin should be enough. You're just trying to establish how much of the fabric will need to be controlled with pleats to get the desired fit.

Step 2:

Measure the excess fabric and determine your number of pleats and depth of pleat. I usually think about where I want the pleats to fall and look for a number which will divide into something easily pin able. The less fancy math the better! In this case I needed 8 pleats of 3 1/2" each (which removed 7" of fabric at each pleat.) I started at the center back, folded my fabric, and pinned in an even pleat from the waist to my hip line (based on the longest of my waist to hip measurements plus my seam allowance) then measured out 1/8 of the hip measurement of the skirt as I pinned it, measured the 7" for the next pleat, folded the fabric and pinned it in place and continued around the rest of the skirt, I basted these pleats in a straight line from waist to hip and then put the skirt on again--inside out this time--to pin baste the waist and darts to fit.

Step 3:

I happen to be making a high waisted skirt so once I had it pinned I measured the distance of all the new pins (seam line) from the original basting and averaged them out (to 1 1/2" in this case) I pinned and basted a straight line from the top of my fabric to the approximate waistline (3 1/2" down) and then a shallow diagonal out to the bottom of the original basting.

Below is a picture of my two lines of basting


And here are pictures of how it currently fits!


My next step is to put a zipper in the center-back seam so I can get in and out of the skirt more easily and then I will perfect the fit at each individual dart/pleat, make sure the skirt is hanging evenly, and finish the waist. I think I'll use ribbon on the inner waistband also...


ps: my good (and mixed blessing) news is that my half-time job is now a full time job! I hope to be back to blogging as I settle into the new routine

Thursday, March 8, 2012

All hemmed!

I got a sudden burst of sewing energy this evening so I worked on my new black, white, brown, blueish-charcoal-gray and pink skirt.

First step: pattern matching

For those of you who may be wondering how to do this, I folded back about 3/4" of fabric at the side seam, ironed it and then made a tube of my skirt fabric (I cut the fabric for this skirt with the selvedge forming the seam allowance at the waist so it is just one long piece) and laid the ironed edge on top of the other side. I made sure the two pieces lined up at the hem and waist and then moved the prepared (ironed) seam line around until the pattern matched. I then pinned it into place on the front of the fabric, pinned it again on the wrong side for sewing purposes, removed the original set of pins and stiched it together in the fold-line I had ironed in. After the seam was stiched I cut off the excess fabric which was lost to pattern matching (a skirt length piece about 9" wide, in this case).

The technique is pretty easy but I had to measure and try matching the pattern in different areas and ponder quite a bit before I cut the fabric because the pattern repeats didn't match at the edges of the fabric.

Step two: the hem

I'm a big fan of doing something interesting with the inside of the hem on skirts. I find it's kind of like wearing fancy underwear, I feel special and a little naughty, which puts a spring in my step, and since the inside of hemlines show surprisingly often I get to share a little bit of intrigue with the rest of the world. Anyway, my hem is faced with a wide pink houndstooth patterned ribbon--in a matching pink--which seems like it will have the additional benefit of rustling when I walk

Nice


When I showed off my new hem to my Clarence I flashed him a peek at the interior and he got a big smile and said "Well, aren't you the wild one?" So I guess it works!

Monday, March 5, 2012

Taking a break...

And working on things utterly non-medieval!


This weekend I've been working on two projects for my other life instead:

A needlepoint pillow for my Clarence's new office and a skirt for me.

The skirt is of Linen in a lovely wild pattern in white, black, dark grey, brown and pink. I've cut out the skirt and purchased some wide ribbon in a wonderful white and pink houndstooth for the hem facing. It's a real shame that the ribbon won't show more often but I think the surprise of the houndstooth will be amazing in the occasional flashes that will be seen as I move.

Lovely.


As to the pillow, it is only the second piece of needlepoint which I have ever undertaken but it's coming along well and super fast in comparison to the kit I made up for a stool cushion a decade or so ago. I'm making a giant ";" in black on a white background, perfect for Mr. C because, as he says, there is always more to say!

Thursday, March 1, 2012

A veil with macramé edging in 29 days?! Hee hee hee.....

...hee hee...haw...Haw...HAW...Ha...HA...HA...HA...HAAAAAAA!

Such a funny girl I can be. :)

Not that I have given up. The work continues, but it's going to be a while. Don't hold your breath!

(Now back to that laughing......)

Monday, February 20, 2012

Speaking of moving...

I just have to mention that I just finished a wonderful dinner of sushi, sushi made with brown rice, which we ordered on-line, and had delivered to our apartment. Yep, you read that right. In West Lafayette, Indiana you can get delivery of sushi made with brown rice!

I love it here.

:)

There and back again

My weekend has been devoted to making another (hopefully the last) trek back to central New York to get the last of our stuff and sign the papers for the sale of our old house.

I'll be keeping my fingers crossed for the next few days ... 'cause it's not over 'till it's over!


Wednesday, February 8, 2012

Tasty Nibble #20

I haven't nearly finished pulling all the fringe on the first edge of my veil, but I've followed in my usual impatient path and started a section of the macramé, voila!

Here it is with my test sample, for perspective.


I'm working the pattern using 3 strands of the warp of my veil fabric for every one thread of the test sample and you can see how teeny tiny this is going to be. Hopefully I will get better at it...

One year old!


This blog. As of today. (And embarking on it's second year.)

Woohoo!

Thursday, February 2, 2012

About that challenge...

Yes, I am working on it. Yes, it is going really slow. We're not talking treacle slow, more like cold tar. (sigh)

I'm pulling thread to prep the fringe for knotting. Over and over again.

I won't bore you with pictures.

The only bit of interesting news is that the actual thread of my linen cloth seems to be about 1/4 of the thickness of my test piece. If I stick with single threads this lace is going to be teeny tiny itty bitty wee!

Speaking of Stunning Hairnets

Just look what Barbara posted over on her blog "It's About Time"

NICE....


(Detail) Portrait of Anna d’Alençon
Gian Giacomo de Alladio, also known as Macrino d'Alba, 1520

Wednesday, February 1, 2012

Things to make one ponder

1) Hasting's blog.

I was reading her post about the Poste she made for the Artemesian Costuming Challenge and I noticed that the bodice of the gown in one of her references


Portrait of a Woman by Paolo Zacchia the Elder

looks a whole lot like like the bodices I 'bone' with hemp cord.

So far as I know, no one has found any definitive evidence that bodices were corded to provide support in period but this picture has me going hmm...

You know, what I need is a research minion!

Tuesday, January 31, 2012

Just an hour to go....

'Till the start of the over and above challenge!

I'm gonna go to bed now, but it's nice to know I (almost) could start...if only anticipation hadn't made me so sleepy...

I wish everyone good luck on your projects!

Monday, January 30, 2012

Oh my!

The hair ornament. The lace. I may not be able to resist this one.


Portrait of Eleonora Ganzaga
Pourbus Frans il Giovane, 1602-1603
Polo Museale, Florentino, Palatina Inventory Item #391

Wow.

Who cares if it's a wee bit post period for the SCA?!?

Sunday, January 29, 2012

I like new pages.

I've finally gotten a clue about just how helpful it could be to use the additional pages in this blog as a place to store my favorite images for projects and ponderings.

One of my upcoming projects (2012 if I can!) is to make myself a pair of great tall venetian shoes...but how tall? And how does the added stature change the balance of an outfit?

Latey I've been finding pictures of Ladies in their chopines so I'm gathering them together here.

Saturday, January 28, 2012

Another Idea for the Over and Above Mini-Challenge


Portrait of a Woman
Unknown Tuscan Artist, 1590-1610
Uffuzi, Inventory of 1890, Item #2300

It's really too bad that I don't need another heavy outer layer, at least not right now. There are so many interesting possibilities!

Maybe I'll have to upcycle my winter coat in the spring...

Friday, January 27, 2012

Cinderella = Gypsy?

Zingarella, Boccaccio Boccaccino, 1504-1505
Uffuzi Gallery, Florence
Inventory of 1890 item number 8539


Apparently Zingarella is an Italian word for Gypsy. This leaves me wondering about the connection between Zingarella and Cinderella. Was she actually a Gypsy? Were her step-family merely trying to insult her...perhaps for being poor and dirty (a conventional prejudice about gypsies)?

If Cinderella were an abusive nickname what was her birth name? And why didn't she use it later in life? Or did she, and perhaps that's why we think of Cinderella as a myth?

I am at home sick today and it's clearly leaving me too much time to think.

Like, what is the connection between brazziarie (sp?)--the Italian name for partlet--and brasserie/bra. I've read in numerous books that 'the origin of the name bra is unknown' but the connection seems pretty plausible/obvious to me!

The erie absense of black folks


I found another Portrait of Maria Salviati
the one in the frame is by Jacopo Carucci after Pontormo, 1543-1545
Inventory Number 3565 from the 1890 inventory of the Uffizi collection.

Looking at the second painting I can't help wondering...is there another little bi-racial girl hidden under all that black paint?

Three words: SHEER BLACK PARTLET

Haven't you always secretly wanted one?


Portrait of Victoria Colonna
Cristofano Dell'Altissimo, 1552-1568
Polo Museum, Fiorentino
Inventory of 1890 Item #204

I'm poking about the online inventories of the Uffizi in Florence today. It's a bit confusing because they maintain their info based on the cataloging event, which means you have to search each group seperately.

I found the search engines through: http://translate.google.com/translate?hl=en&sl=it&tl=en&u=http%3A%2F%2Fwww.uffizi.firenze.it%2Fmusei%2F%3Fm%3Dcostume

Click on "Digital Archives" in the menu on the left. Searching the inventories has been working for me.

Thursday, January 26, 2012

And Whooppee! They have another shoe!


Zoccolo Zoccolo. Calzatura formata da una parte in legno composta da un elemento orizzontale lanceolato sorretto da due rialzi di forma triangolare. In una delle due estremità superiori è fissato con tre borchie metalliche su ciascun lato, un tessuto, Gros de Tours a pelo strisciante, di forma romboidale con piccola nappina dello stesso filato a decorazione. Accessori
XVI-XVII 1580 1620 fine/inizio

(Per google translate "Socket socket. Footwear consists of a wooden part consists of a horizontal lanceolate supported by two triangular elevations. In one of the two upper ends are fixed with three metal studs on each side, a fabric, Gros de Tours sleeping creeping, diamond-shaped with a small tassel of the same yarn decoration. Accessories")

OK, carving and covering cork chopines kinda scares me but I think even I could probably make these!

OMG. I apologize.

For years I have been muttering inside my head about people who inserted permenent puffs into their clothes rather than pulling out their shifts, smocks, shirts, camicias, or what have you.

I though the static puffs were a modern costumers' convience.

I stand corrected.


Maniche Su fondo ocra piccoli motivi di tulipano marrone disposti secondo teorie di fasce parallele sfalsate. Ai gomiti e all'attaccatura della spalla "sbuffi" di raso di seta bianca. Piccoli lacci nella parte alta della manica. Abiti (which Google translates as "Sleeves on small ocher brown tulip motifs arranged in parallel bands staggered theories. Elbow and shoulder to root of "puffs" of white silk satin. Small laces at the top of the sleeve. Clothes"}
XVI-XVII 1580 1620 fine/inizio
Ca' Mocenigo Centro Studi di Storia del Tessuto e del Costume

Clearly, I don't spend enough time doing research.

I just discovered that many of the Venetian museums have pooled their artifact collections together into a single, searchable, database at: http://www.archiviodellacomunicazione.it/Sicap/opac.aspx?WEB=MuseiVE&LNG=ENG

I searched for "tessuto" and found this!


"Arte spagnola
Tessuto Velluto chermisi tagliato ad un corpo con applicazioni in raso di seta prodotto dall' orditura di fondo in seta gialla e da una trama di fondo verde Tessuti
XVI 1500 1599 inizio
Ca' Mocenigo Centro Studi di Storia del Tessuto e del Costume "

It's very like the applique work I am doing on my pavillion and it's giving me some great pointers for how I can use the couched thread for detailing overall.

I'm such a happy camper!

Wednesday, January 25, 2012

Macrame Sample: What do you think?

I noticed while I was working on my test sample that the pattern for the points in the extant piece is clearly a few threads larger than the blocks-and-knots section, and the original blocks are proportionally larger (wider) than mine. Maybe 12 or 16 threads wide instead of the 8 threads I use.

Still the sample is finished and I'm pretty happy with the result.


I'll probably try crossing the threads at the top and bottom of the knot sections to help the illusion that they are loops of cord and I might make the crossover in the center of the point shorter by 1 square knot. I'm generally not interested in making exact copies of anything so I think I am content with my symetrical pattern. It will certainly be easier for me to work!

It looks like I will need to fringe about 18" of my fabric to get enough free thread to work the macramé and tassle. I'll end up cutting off about 5" of thread in the end but I think I'll need that much (plus the 4" from the tassle) to be able to manipulate the threads.

Providing that I can lay my hands on a 4 yard piece of sheer-ish linen fabric I think I've found my Over and Above Mini-Challenge project.

Tuesday, January 24, 2012

Extant Italian Capes

For those who are looking for ideas for the Over and Above mini-challenge.

At the Los Angeles County Museum of Art:


Man's Cape
Italy, last 1/4 of the 16th Century


Man's Cape 1480
Italy, Florence

Over and Above, It's a go!

The Realm of Venus "Over and Above" mini-challenge is officially going forward so I guess I'd better decide what I'm going to be making.

I've been working on a test version of a macrame pattern using the thin crochet cotton I'm using for my partlet project. It's a bit thicker than the threads of my linen fabric would probably be, so I think it will be a pretty good gauge for figuring out how much of the fabric I would have to fringe to be able to work the macrame, as well as if my looking and pondering and counting and planning enabled me to come up with a reasonable version of the pattern.


Image #377 from Ricci's Old Italian Lace, Volume 1, 1913


As you can see the pattern is basically a series of tasseled knotted points depending from a band of alternating blocks and knots.

I've gotten the band portion finished in my sample but I'm not quite happy with it. I think it needs more of a gap between the blocks of Diagonal Hitch and the knot. Maybe if I crossed the sets of starting threads on the knot? Hmmn. Something to ponder while I work up the point and tassel section.


Saturday, January 21, 2012

Concurrences: Being my musings on project ideas for the "Over and Above" Challenge at The Realm of Venus

The focus of the challenge is on outerwear, mainly coats of various sorts, but since I already have a stunning loose gown which I rarely get to wear I'm going to be working on a Venetian-style veil.

Poking about for inspirational pictures on the web has shown me that while Venetian veils share a common theme as to size (huge!) there is a great deal of variety in shape, color, texture, opacity, decoration and manner of wearing.

Shape: I see evidence of rectangles, triangles and half-circles being common veil shapes. Additionally I find several illustrations that suggest the veil may be a rectangle which has been folded across the breadth and stitched together along one of the long edges. (Thus making a 1/2 open pouch shape rather like a coif) Admittedly, the pouchy bagginess of the drape of these veils could have been achieved in other ways--such as the judicious use of pins--but I find the possibility of a structured veil intriguing.

Color: Along with black, white, and the legendary yellow, I find evidence beige, blue, gold, red, pink and green. Notably, one example appears to be a two-color shot silk organza whose overall effect is a coral-pink.

Texture: I see evidence of veils in a variety of textures, fine to coarse, plus both smooth and textured weaves. In addition, the veils appear to have a variety of 'hands' from a liquid drape to a rather crunchy stiffness.

Opacity: While I had believed that the veil would be slightly-translucent-to-opaque in most cases, it appears that the reverse may be true. In the majority of illustrations I have seen the veil material is in the translucent-to-sheer end of the range and it is frequently very nearly transparent. It should be noted, however, that once removed from the head an opaque veil simply looks like a shawl, tablecloth, or random piece of fabric drapery so it is likely that I have misinterpreted some objects that a period viewer would have recognized as opaque veils.

Decoration-Overall: In addition to the many examples of various types of woven stripes, I find hints of more elaborate patterns. Whether these patterns were confined to bands at the edges of the veil and whether woven or applied is unclear.

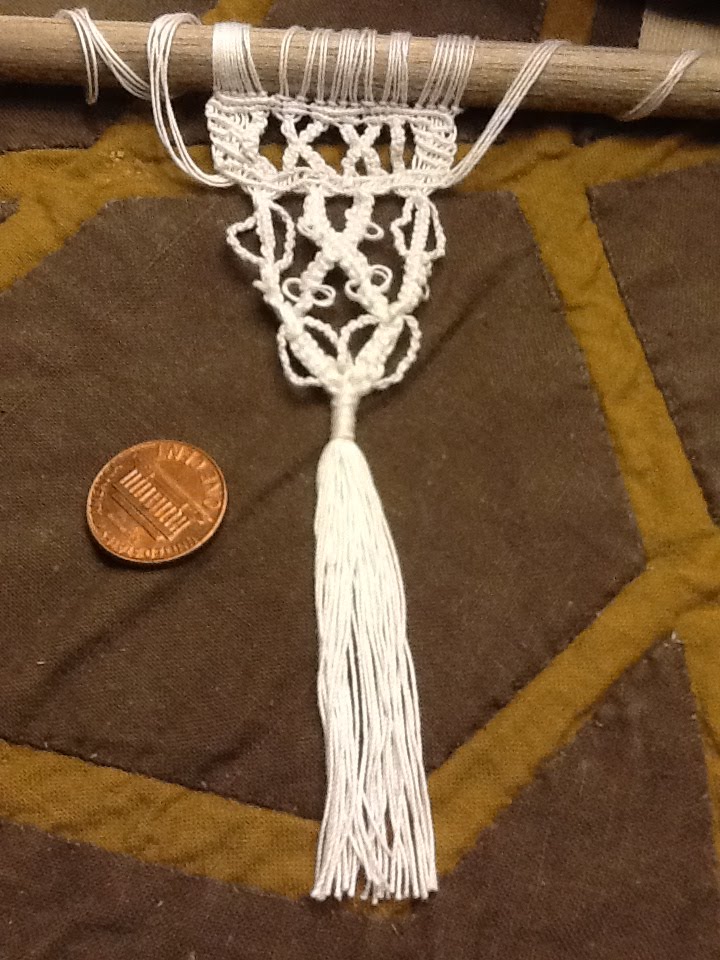
Decoration-Edge: Plain hems, fringe, plain lace, tassels and ornamented lace are all seen.

While there may well have been meaning ascribed to veils of different colors, etc. (the language of the veil :) ), it seems likely that, in some cases at least, the color, shape and materials of one's veil were a personal aesthetic decision.

So, I have been mulling over options for a new veil. I am on a personal mission to bring more pattern into SCA events so I rather like the idea of of a striped veil. I also really like handwork and trying new things so I've been thinking a lot about edge treatments. Hmm. What to do?

Which brings me to the afore-mentioned concurrences...

Veil Option 1:

Sheer with woven textured stripes


Mores Italiae, 1575


Mores Italiae, 1575


Agnolo Bronzino, 1550


Corded silk Organza (available on e-bay)

Veil Option 2:

Sheer with woven gold stripes


Cesare Vecellio 1589-90


Bartolomeo Veneto 1520's


Silk organza with gold stripes (available on ebay)


Veil Option 3:

Translucent with an amazing edging

I'm thinking a sheer linen with lace edging...maybe in knotwork?

Thursday, January 19, 2012

Just one more from the Walters Art Museum, Baltimore


Kitchen Interior, Dirck de Vries, Netherlandish, ca. 1600

And this is why we love the Walters Art Museum, Baltimore

Because they have Great Stuff! For Example:


Gondola Ride (A page from a larger work "Book of Italian Costumes")Niclauss Kippell (German) 1588

And they plan Great Exhibits! I know where I'll be this fall. In celebration of my birthday I'm going to their upcoming show:

Revealing the African Presence in Renaissance Europe

This is particularly timely for me because I have spent the last few days working on a page of black folks in period art. One of my personal challenges as a reenactor of color has been finding a plausible persona which *includes* (rather than ignores) my actual ethnic heritage. I've been scouring the web looking for the occasional images I can remember seeing of people of African heritage just living their lives in Venice, or Amsterdam, or wherever. They are there, yes, but terribly hard to locate...and then here comes The Walters Art Museum with an entire show which not only discusses the history and art of the period but also what has happened to the works over time.

(Apparently the little Medici girl in the painting below was painted out in the 19th Century and rediscovered during cleaning. Wrap your head around that.)

I can hardly wait for the show!


Portrait of Maria Salviati de Medici and Gulia de Medici, Jacopo Pontormo, 1600
Walters Art Gallery, Baltimore, Maryland

Wednesday, January 18, 2012

Fantasy shopping....


They have the most wonderful Spanish case/traveling desk for sale on ebay...


I want!

Saturday, January 14, 2012

Have you ever heard of Matthaus Schwarz?

I hadn't until today. Trust me, you must go read the last two paragraphs on this page, look at the pictures and then tell me if it makes your little seamstress' heart beat faster!

http://theborgias.wetpaint.com/page/Italian+Renaissance+Clothing+and+Fashion

(Can you imagine? There are more than 130 little pictures of him in his new outfits...I can only dream of the day when I can say the same!)

We Were There: Stripes!

Do you ever wonder what is going on with all the outfits in solid colored fabrics at events? I do!

I understand that an opulent damask or brocaded velvet in 100% silk or linen may be out of the reach of the average renactor's pocketbook, but what could possibly explain the absense of of that most basic of woven patterns-stripes?

Hmmm....?

I've heard some people claim that 'they didn't wear stripes in europe in period' but the pictoral record would seem to disagree.

So I decided to start a page on which I can post some of the lovely evidence I find for stripes!

Startng with this lovely at the Brookly Museum;

Portrait of a Lady as Mary Magdalen, Barolomeo Veneto, 1520's

Brooklyn Museum: Portrait of a Lady as Mary Magdalen

Thursday, January 12, 2012

Sunday, January 8, 2012

Well the ACC show-off-your-work-&-announce-the-winner event (otherwise known as 12th Night)is over...

Is there a winner? Is judging still going on? Did someone declare Internet silence until some later date?

I, for one wanna see some pictures!

Wednesday, January 4, 2012

Two Things

Thing One: Artemisians are starting to scare me.

I've been reading the project write ups the participants in the ACC are putting out on-line and after my initial reaction of amazed delighted awe I keep coming back to their lists of items and interesting tendency towards saying something on the line of:

"For the challenge I made one piece for each of the required four layers--oh, I made 2 versions of my layer three, one in linen, one in wool but both entirely hand sewn--and these seven additional accessories...oh and here I am, wearing the full outfit with the pin and bag and (insert 27 other items here) I made to go with it. I guess that makes a total of 41 items. Oh yeah, maybe I should include the 7 things I made which I'm not wearing because I decided they weren't *quite* the right color..."

Who are these people!?!

Where do they find the time!?!

Seriously, I keep thinking of what Anya said: "Nobody could do that much decoupage without calling on the forces of evil!"

:)

Artemisians. Yes, they're better than the rest of us.


Thing Two: Partlet progress report


As you can see, I have stitched together a great deal more of the seams to create the neckline of the partlet. It feels a lot better and looks better too, I think, so I'm now working on adding the additional pieces to finish the back of the partlet. I'm also still considering the question of bust support and coverage. I'm currently considering the potential of making a white linen partlet based on the bust supporting ideas posited by Robin Netherton with her work on the Gothic fitted dress. If I made it waist length and laced it closed to just the top of the bodice I wonder if it would work to support a bust my size? The pondering continues as I work on the stitching at the edges of my lacis pieces...

Monday, January 2, 2012

The partlet is starting to come together


As you can see, I have begun attaching the lacis squares together to create my first partlet. I'd been thinking that if I only stitched the squares around the neck opening 1/2-way it would make a good neckline and the beginnings of a standing collar. I still like the concept but this picture shows me that I will need to close the seams a good bit further to get the fit I'd like. Maybe 3/4's of the way...?

I like it that the shoulder squares will clearly provide plenty of coverage down into the sleeve of my gowns...not so sure about a single square providing enough depth to the back of the partlet but I think I'll need to get the neckline fitted before I know if I'll need to add another row to the back (rather than just squaring it off as I had planned.)

My new quandary is the transparency question. This is clearly a racier style but I'm beginning to wonder if it is racier than I am comfortable with. I feel a lot naked-er in the lace than I expected. After some pondering I've come to suspect that my cafe-au-lait skin tone provides so much contrast to the lace that it screams "she's naked under here!" while the portraits I was inspired by (which are all of women with much lighter completions) merely hint at it.

I'm planning to continue on the partlet and see how I feel when it is finished and part of a complete ensemble. If it turns out that I am just too modern to wear it with a 1590's bodice I can always wear it with a gown with more fabric to the bodice, but I notice that the photos don't actually look nearly as naked as I feel...interesting.